
Learn how to create, manage, and bill shared profiles, add members, and customize settings in your Power Diary account with ease.
Creating and managing shared profiles in Power Diary allows you to streamline appointments, invoicing, and record-keeping for couples or other shared treatments involving multiple clients. This feature is designed to simplify the process by consolidating important details into a single profile, making it easier to manage joint appointments, track payments, and keep comprehensive session notes for shared treatments. Whether you are coordinating care for families, couples, or groups, shared profiles offer a seamless way to handle all aspects of client management efficiently.
In this article:
- Creating a New Shared Profile
- Overview of a Shared Profile
- Creating Appointments for Shared Profiles
- Invoicing the Shared Profile
- Using Advanced Search for Shared Profiles
Creating a New Shared Profile
1. To create a shared profile*, click 'People' on the main menu > select Add > select 'Shared' as the profile type you are going to create.

2. Enter the profile name and click 'Next'.

3. A new shared profile will be created. You will be able to add members of this shared profile. Click 'Add Member:'

4. You will be able to select existing client profiles to add them as members of this shared profile. Click the 'Select and existing client' and search for a profile you'd like to add.

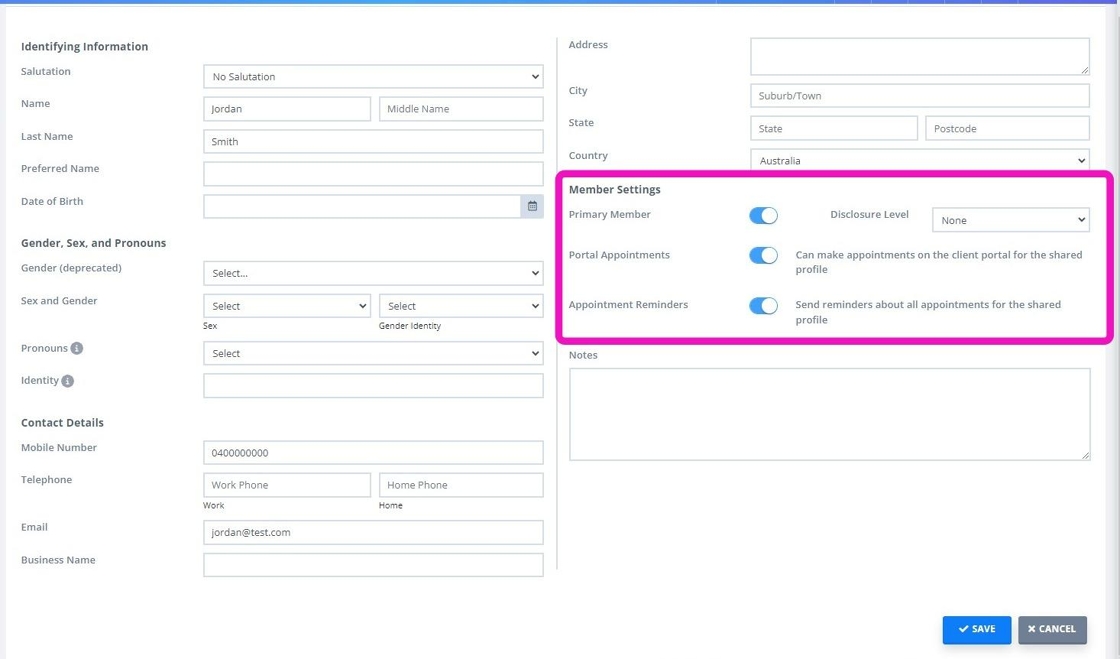
5. The first profile you add will automatically become a primary member of the shared profile. You will be able to disable this setting and enable it on another profile, if necessary.

6. On the member settings, you will also be able to allow the member to make portal appointments on behalf of the shared profile, and receive appointment reminders for the shared profile.
7. To add more members, go the shared profile Details page and click 'Add Member' again.

8. Beside selecting an existing client profile to add as a shared profile member, you will be able to create new client profiles for the members, when necessary.

*Note:
- A new shared profile can only be created via the People > Add menu.
- When new profiles are created on the new appointment panel, on the Waitlist or when clients register via the client portal, they will be created as client profiles.
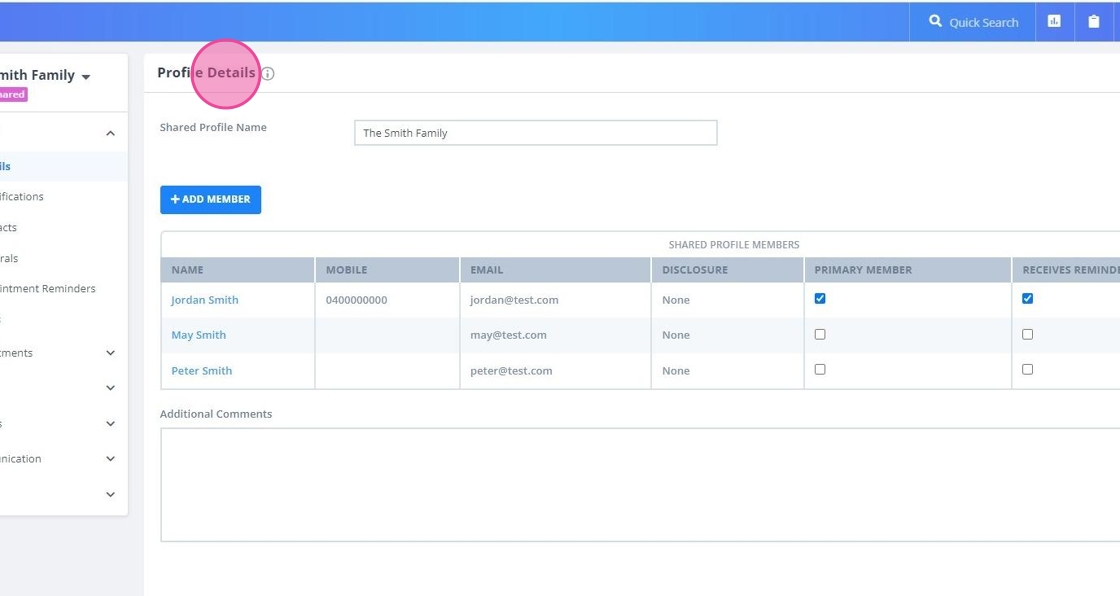
1. The shared profile Details page includes a list of added profile members, their contact details and their member status and permissions.
Use the 'Additional Comments text box to enter additional information about the profile.
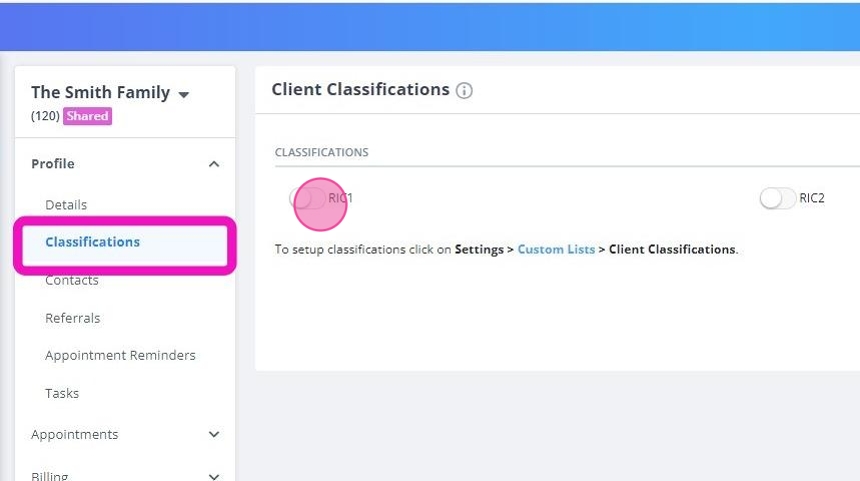
2. The Classifications page allows you to allocate one or more of your account client classifications, which will be very helpful with account reports.
3. The Contacts page allows you to add contact profiles to the shared profile.

4. Use the Referrals page to add referrals to the shared profile.

5. The Appointments Reminders page lets you configure reminder settings specific to this shared profile, which will override the general automatic reminder settings of your account.

6. The Tasks page is where you can manually set tasks for this shared profile and assign them to specific users if necessary.

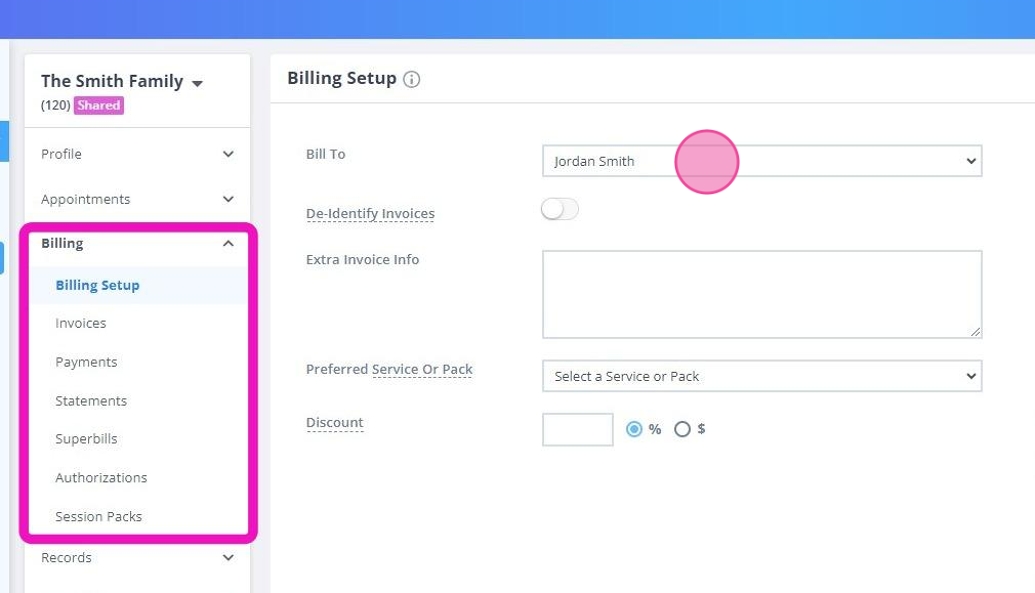
7. The Billing section will hold all the billing details and records of invoicing and payments for the shared profile. The primary member will be allocated as a payee for the shared profile by default. It is possible to select other payees when necessary.
8. The Records folder records confidential information of the shared profile, including their session notes, file uploads, correspondence and diagnoses.
Note: online forms can only be sent to each shared profile member individually from their client profiles.

Session notes created in the shared profile will be generated as records of the whole shared profile, not per a specific profile member.

9. Use the Communication feature of the shared profile to send SMS, emails and generate letters. The primary member of the shared profile will eb a default contact, and you will be able to CC communication to the other profile members.

10. The Admin > Manage page allows you to record the personal data consent, archive and delete the shared profile. More features will be added to the Admin > Manage settings in future releases.

11. The Admin section of a shared profile also allows to add and store admin notes and admin files.

1. To create a new appointment for the shared profile, select the calendar time block to bring up the appointment panel. Search for the shared profile in the Client search field.
Add other appointment details and service, if needed.
Save the appointment.

2. The client type appointment will be generated for the shared profile.

1. Invoices generated for the shared profile will be billed to their primary member by default. You can set a different default payee in the Shared Details > Billing > Billing Setup page.
2. You will also be able to select a different payee on a specific invoice when needed.
3. Here is an example of a shared profile invoice. The Invoice To field will include the payee information, while the Provided to section will list all members of the shared profile.

1. The People > Shared menu allows you to search for shared profiles and get an overview of all shared profiles in your account.

2. The Advanced Search feature will help you search for one or a list of shared profiles, filtered by shared profile members details, shared profiles appointments information and classifications.
