Power Diary integration with Stripe allows seamless collection and storage of clients' credit card details and processing payments.
Stripe is a leading global provider of online payment processing services. Our integration allows you to seamlessly collect and store clients' credit card details, and process credit card payments directly through your Power Diary account. It also enables your clients to pay for appointments via the Client Portal at the time of booking. In this article, we will show you how you can use Power Diary Online Forms and Stripe integration to easily and securely collect your clients' credit card details.
In this article:
- Using Online Forms to Collect Credit Card Details
- Adding Credit Card Details Manually
- Recording Credit Card Details when Processing Payments
Using Online Forms to Collect Credit Card Details
In Power Diary, it is possible to collect clients credit card details securely using Power Diary Online Forms. The collected credit card details will be automatically transmitted and stored directly into your connected Stripe account.
Let us step through the necessary steps together: First, we will add a Credit Card (Stripe) Linked Profile Field to an Online Form Template:
- Navigate to Tools → Form Designer;
- Create a new Online Form Template, or open an existing Template to edit. We decided to use a New Client Intake Form.
- Click on the blue 'Add Field' button and select the 'Linked Profile Field' question type.
- In the 'Select the Profile Field' dropdown list, scroll to find and select the 'Credit Card (Stripe)' option:
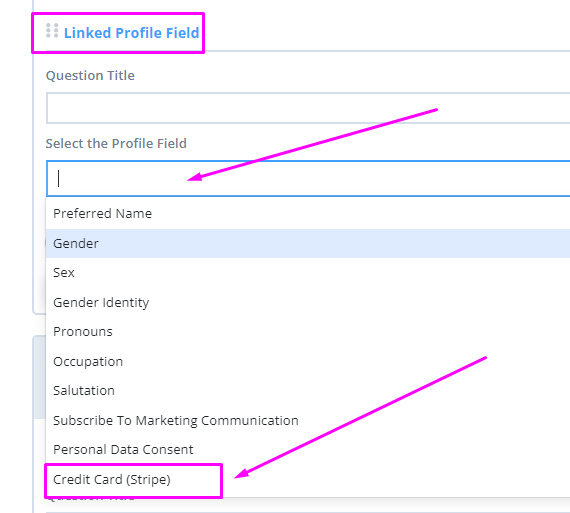
Save the changes. Done! You have an Online Form Template that you can use to send to the clients and collect their credit cards securely. Read further to find out how you could send this Online Form Template to your clients.
- Then, you will add an Online Form Template with the Credit Card (Stripe) Linked Profile Field to a Communication Template.
You can add an Online Form Template to a Communication Template - such as email or SMS - to send it to the client automatically or manually:
- Navigate to Tools → Communication → Templates;
- Create a new email or SMS template, or open an existing one to edit. We decided to use the "Client Portal - New Registration Notification to Client" as an example. This template is automatically sent to each new client who registers via your Client Portal in Power Diary.
- Click on the Available Merge Fields link;

- Select the Links to Online Forms option.
- Copy the correct Online Form Template merge field code and close.
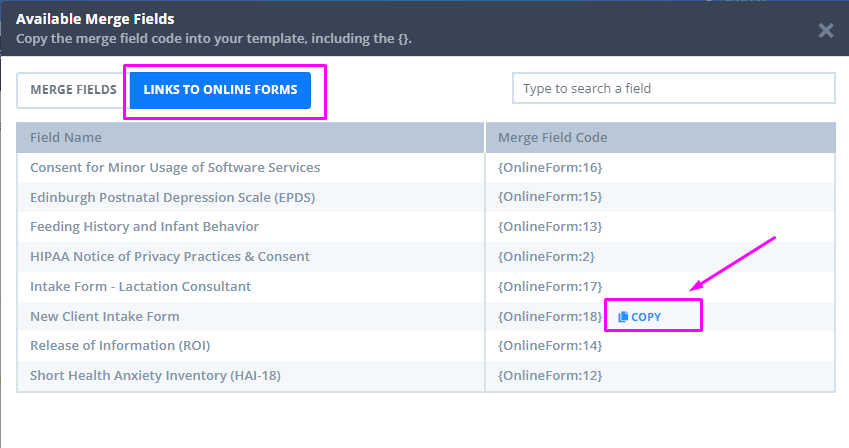
- Paste the copied Online Form Template merge field to the Communication Template content and add some instructions if necessary.
- Click the blue 'Save' button.
- Now that you have your Communication Template(s) ready, you can use them;
- To set your Client Portal automatic notifications (in Settings > Schedule > Client Portal > Notifications),
- or when manually communicating with a client from Client Profile → Communication → New Email or New SMS.
These templates will generate individual Online Forms to collect client details.
- When a client clicks on the Online Form link that you sent them, they will be asked to enter their details.
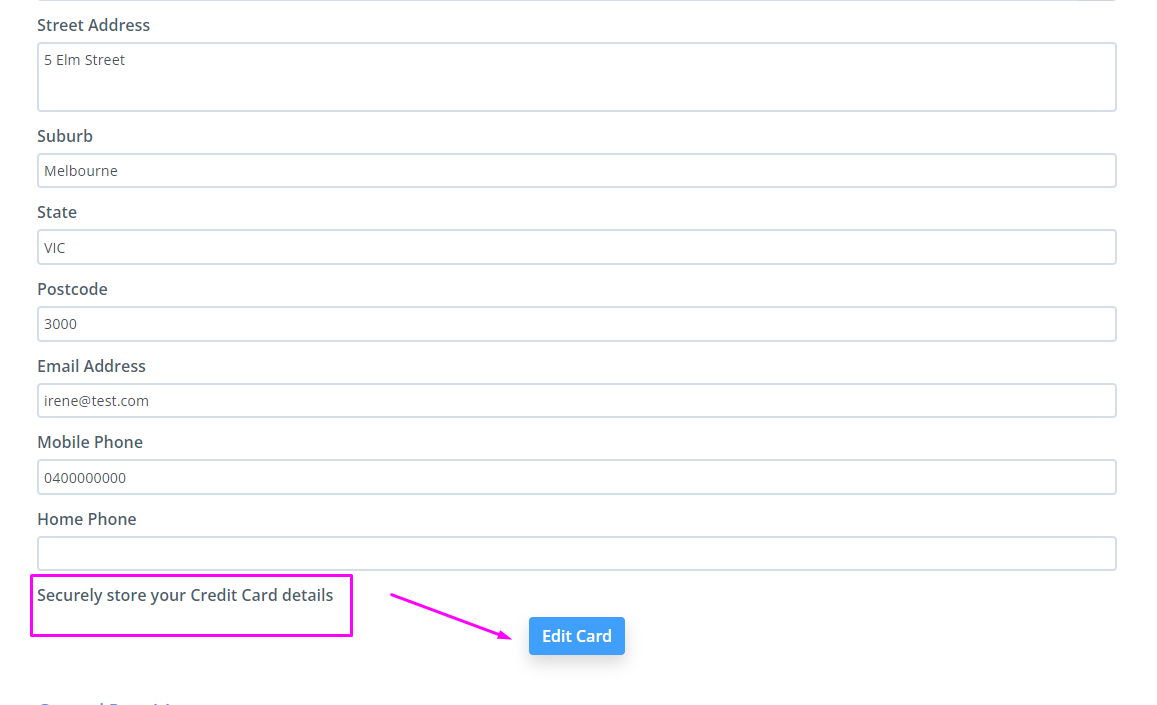
1. The Linked Profile Field that we added to the Communication Template will ask them to enter their credit card details:
 2. When they click on the blue 'Add Card' button, this is what clients will experience:
 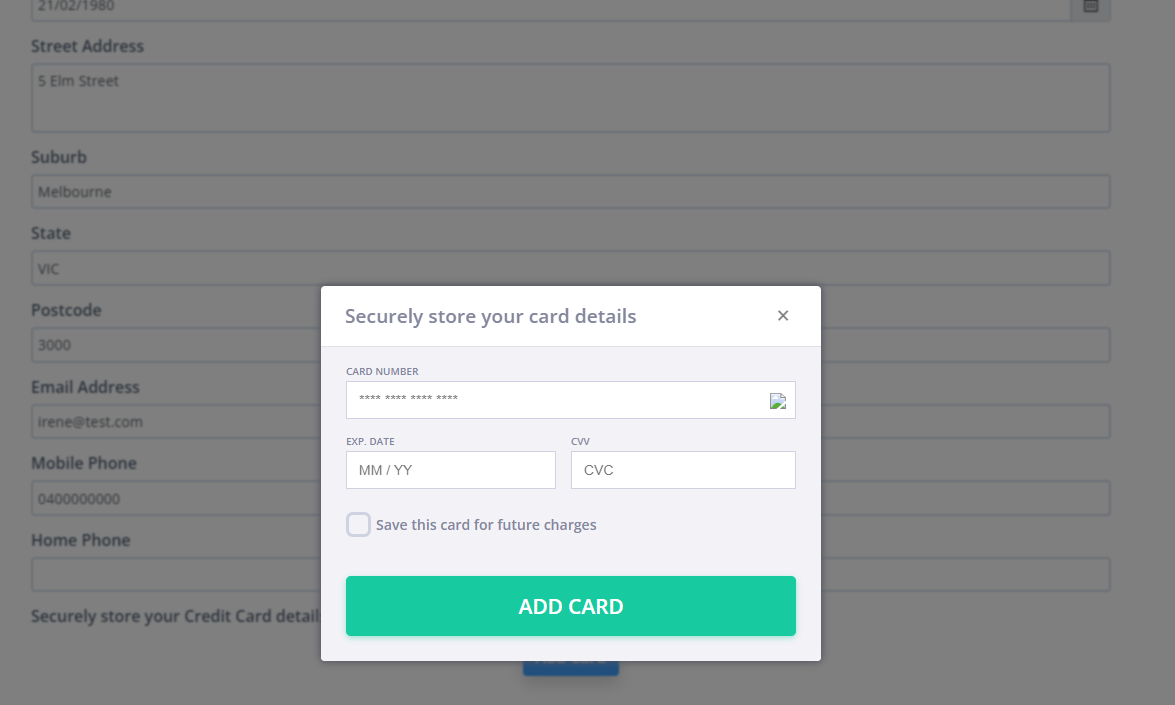 3. Clients will enter their Credit Card details and tick the 'Save this card for future charges'.
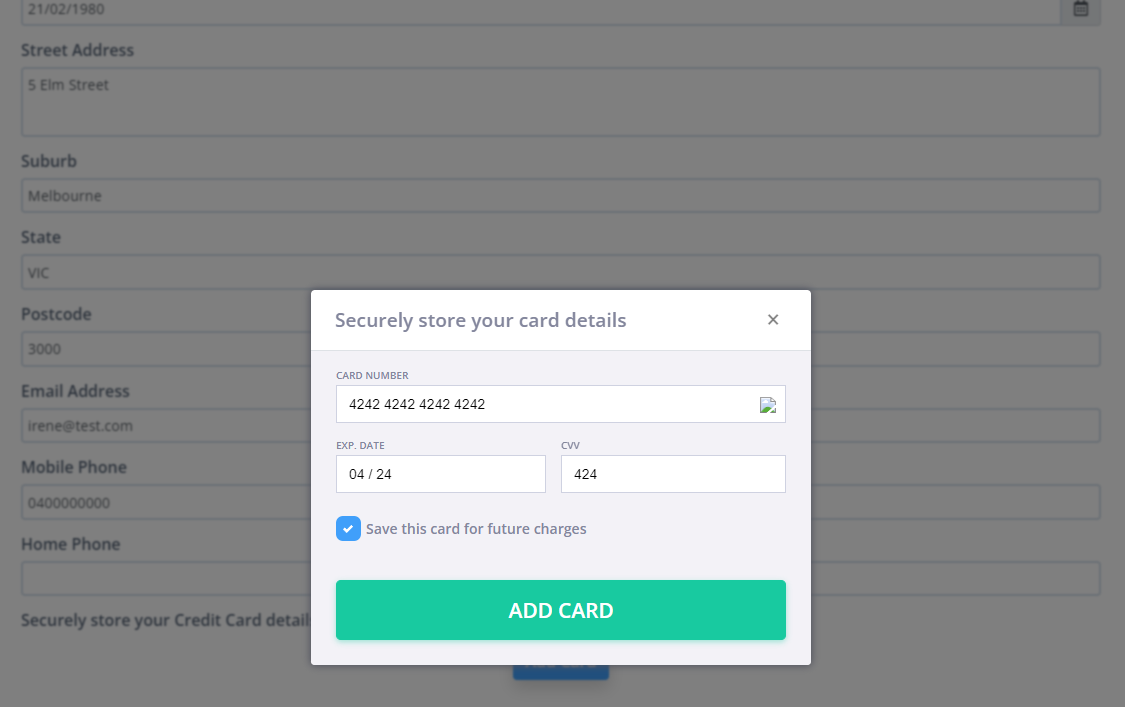 4. They will have the option to click the blue 'Edit Card' button before they click on the 'Finish' button at the bottom of the Online Form to submit it.
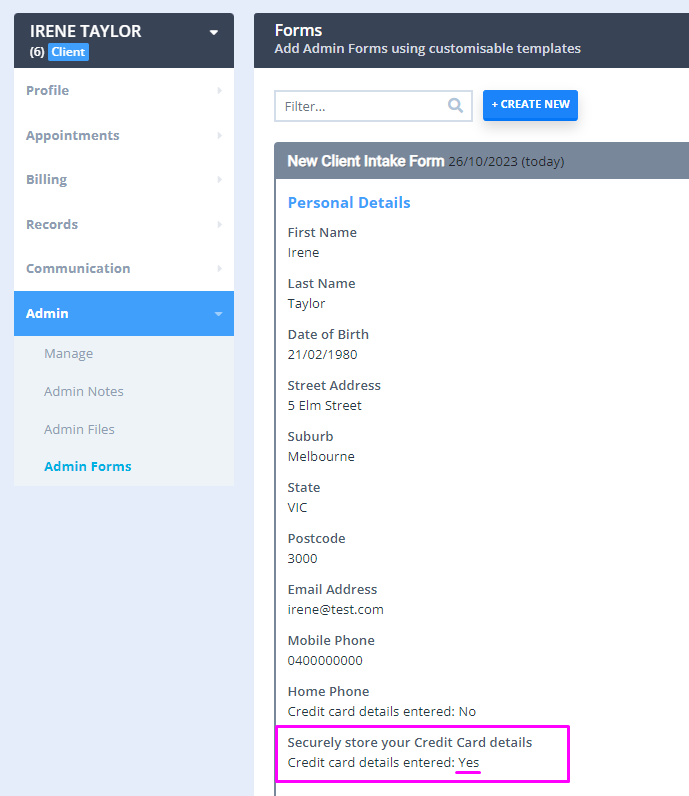
  5. When the form is submitted by the client, it will be saved in Completed status in Client Profile → Records → Forms (and Admin → Admin Forms if it is an Admin-type form). Here is what a Power Diary user will see. The actual Credit Card details are transmitted and stored into your connected Stripe account, ensuring security.
Adding Credit Card Details Manually
Beside using the online forms, it is always possible to enter client credit card details manually, when they are provided to you by a client in person, or over the phone or video:
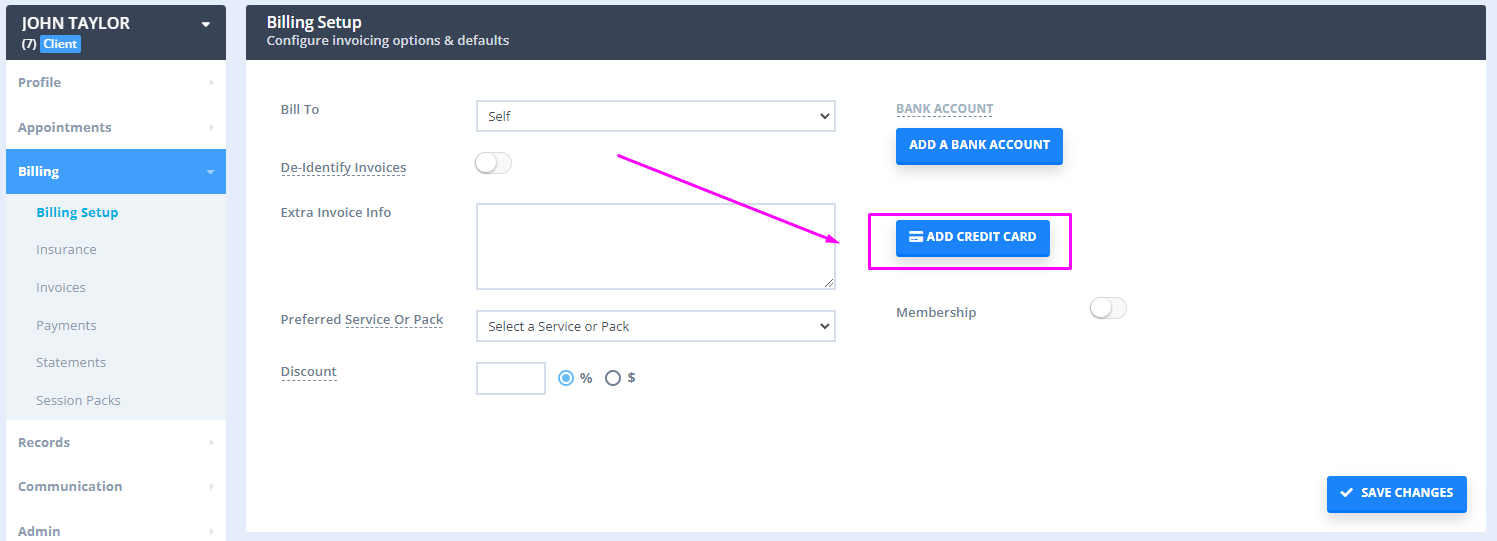
- Navigate to Client Profile → Billing → Billing Setup;
- Click on the blue 'Add Credit Card' button.
- Type in the client's Credit Card details and save. The details will be stored in your connected Stripe account.
- You can always return to this page to edit or remove the stored credit card details.
Recording Credit Card Details when Processing Payments
Besides the above two options, clients' credit card details can be captured and stored for future use when their payment is processed via Stripe by either a Power Diary user, or when processing a payment via the Client Portal.
There are three ways of initiating a credit card payment for an appointment/invoice:
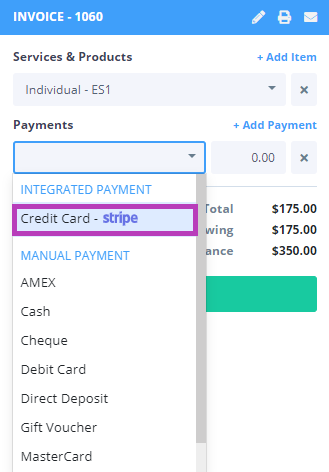
- Select a Client Appointment on the Calendar. On the right side of the screen, in the Invoice section, use the Payments drop-down list to select "Credit Card - Stripe".
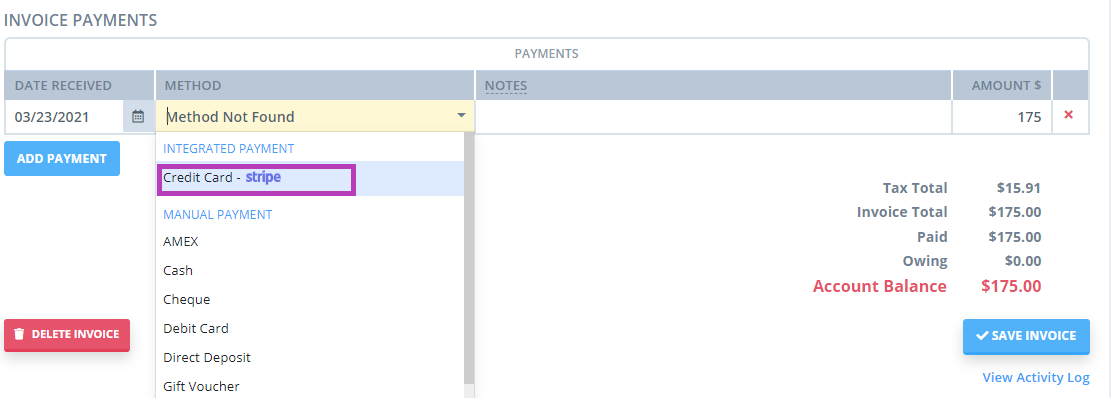
- Navigate to an invoice that you would like to process a credit card payment for (via the Client Profile under Billing → Invoices or via one of the Reports). Click on the Invoice Number, under the Payments section of the Invoice click "Credit Card - Stripe" in the Method drop-down list.
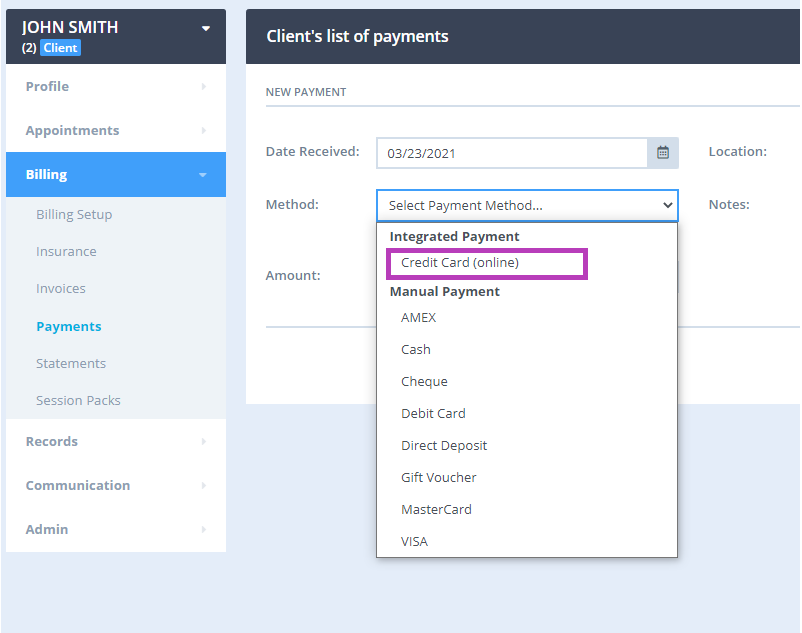
- Navigate to Sales → New Payment, then enter a client into the Search Bar. You will then fill in all the necessary fields and select "Credit Card (online)" in the Method drop-down list.
After clicking one of these options, a card details pop-up will appear. If this is your first time taking a credit card payment from this client, you will need to enter their card number, expiration date and CVC (Card Verification Code). The card details will then be stored by Stripe for future transactions. Once you have entered the details, click Pay to process the payment. You'll get an immediate response advising if the payment was successful or not.
When a client is asked to or chooses to pay for the appointment in the client portal, they can also tick to 'Save their credit card details for future charges'.
- In Settings > Schedule > Client Portal > Access and Settings, set the 'Credit card payment required when booking' as necessary:

- You can also set a service deposit on specific services in Settings > Billing > Services.
With this setup, a client will be asked or offered to pay for a service they are booking. The payment form will also have the option to save the credit card details for future charges.
Hint 💡
Credit card details entered via the Credit Card linked profile field in an online form, in Client Profile > Billing > Billing Setup or a payment form and saved for future use will override credit card details that were entered for this client previously.
