
Learn to generate and export a list of invoiced services for NDIA-managed clients from Power Diary for bulk payment requests via the NDIS myplace portal.
Power Diary users located in Australia are able to generate a list of invoiced services for NDIA-managed clients that can be exported to CSV and then uploaded to the NDIS myplace portal to bulk request payments. Read this article to find out how.
In this article:
- Setting Up Power Diary For NDIS Bulk Upload Report
- Generating NDIS Bulk Upload Report
- Understanding Report Columns
Note
You can find NDIS myportal resources for your reference here.
How To Set Up Power Diary For NDIS Bulk Upload Report
Here is a checklist of what needs to be set up before you are ready to run the report.
- Add your business ABN in Settings > Configuration > Business Info.
- Set up the NDIS insurer type in Settings > Custom Lists > Insurers.
- Add NDIS insurer information to practitioner profile(s).
- Set up a third party payee profile for the NDIA.
- Set up appointment cancellation reasons with wording as required by NDIA, in Settings > Custom Lists > Cancellation Reasons.
- Add NDIS Claim Types as Saleable Categories in Settings > Custom Lists > Saleable Categories.
- Add GST Codes as Tax Rates in Settings > Custom Lists > Tax Rates.
The NDIS Tax Codes P1 or P2 are assigned in the NDIS Bulk Upload Report automatically based on the tax rates you set up. P1 will be assigned for all services and products with any amount of tax applied, and P2 will be assigned for any services or products with no tax or 0% tax. - Set up or update your service templates to ensure they include
- the relevant item code for NDIS support number,
- service duration,
- service price,
- the correct tax rate for a GST code,
- saleable category for an NDIS claim type
9. When you take in a new NDIS client, enter their NDIS information required for the NDIS Bulk Update Report:
- NDIS participant number should be added in Client Profile > Billing > Insurance using NDIS insurance type;
- Add the NDIA third party payee as their default payee in Client Profile > Billing > Billing Setup, in the Bill To field.
How To Generate NDIS Bulk Upload Report
The report is located in the Reports > Financial > NDIS Bulk Upload tab.
Hint
If you do not see the NDIS Bulk Upload report tab available, please navigate to Settings > Configuration > Business Info and set your account's 'Country' as Australia. This report is available to accounts located in Australia only.
1. Let us take a look at the report filters first:
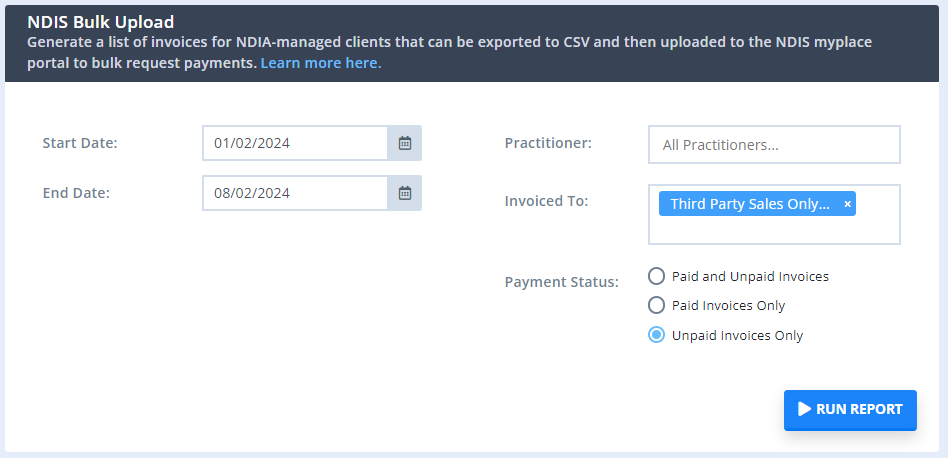
- The 'Start Date' and 'End Date' are set to the past week period by default, but you can change the report period to other dates to match your internal processes. The report will include invoices with an Invoice Date that is within the selected time frame.
- Use the 'Practitioner' filter to filter the report by specific practitioners who provided services to NDIS clients. It is set to All Practitioners by default.
- The 'Invoiced To' filter is set to 'Third Party Sales Only' by default, to exclude any invoices billed directly to the client. Select the NDIA third party payee(s) whose invoices you will be uploading via the NDIS bilk upload.
- The 'Payment Status' is set to 'Unpaid Invoices Only' by default to pick up the invoices that still need to be paid by the NDIA.
2. Once you set the invoice filters as needed, click on the ' Run Report' button to generate the report.
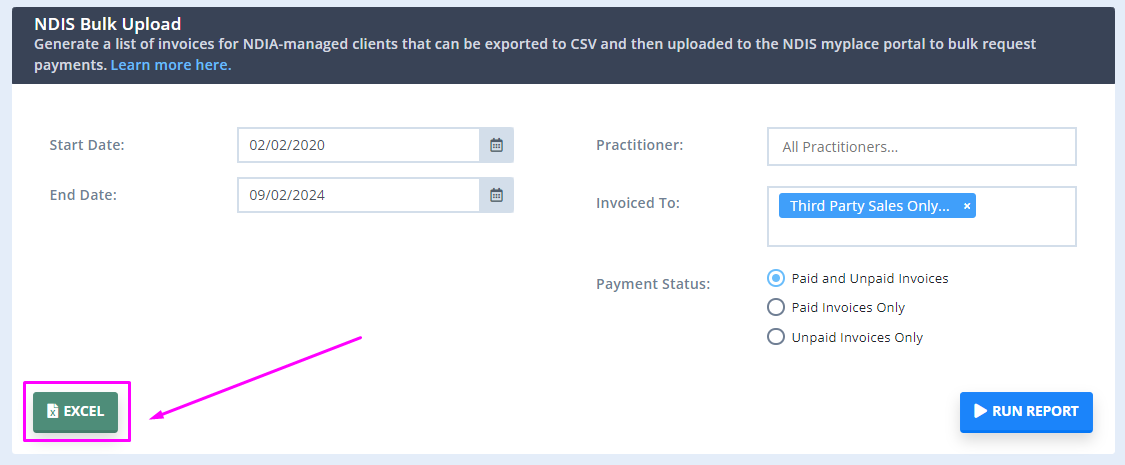
3. When the report is ready, click on the ' EXCEL' button on the left to export the report and download it as a CSV file to be uploaded via the NDIS myplace portal.
Understanding the NDIS Bulk Upload Report Columns
Let us take a look at each column in the NDIS Bulk Upload report and what Power Diary data is pulled to generate it, for your better understanding of the process.
- Registration Number: Mandatory field, includes the Provider’s registration number shown in your NDIS myplace profile as Organisation ID. In Power Diary, it is saved in Settings > Practitioners > Edit Practitioner > Insurers > NDIS.
- NDIS Number: Mandatory field, includes Participant NDIS Number. In Power Diary it is saved in a Client Profile > Billing > Insurance > NDIS insurer type > Enter their NDIS number.
- Supports Delivered From: Mandatory field, includes start date of the support provided. It is the Power Diary invoice date.
- Supports Delivered To: Mandatory field, includes end date of the support provided. It is the Power Diary invoice date.
- Support Number: Mandatory field, includes Support Item number of the service provided from the NDIS Support Catalogue 2019-20. In Power Diary, it is the invoice item code.
- Claim Reference: Optional but recommended field, includes the Provider’s own Invoice reference for the payment. It is the Power Diary invoice number.
- Quantity: Mandatory field IF Hours are not entered, includes number of units. It is the Power Diary Invoice item Item Qty field.
- Hours: Mandatory field IF Quantity is not entered, includes actual duration of the service provided. It is the Power Diary Invoice item Qty field.
- Unit Price: Mandatory field, includes Price per unit sold or the hourly price of the service provided. It is the Power Diary Invoice item price.
- GST Code: Mandatory field, includes GST as applicable to the item or service. P1 = Tax Claimable (10%); P2 = GST Free; P5 = GST out of Scope. Power Diary tax rate is used to define GST codes.
- Authorised By: Legacy data which can be left blank.
- Participant Approved: Legacy data which can be left blank.
- In Kind Funding Program: Not applicable; can be left blank.
- ClaimType: Mandatory field, includes claim type of the service provided. It is a Power Diary saleable category linked to service selected in invoice item line.
- Cancellation Reason: Conditional field (only applicable to Cancellation claim type); includes reason of the cancellation type; Power Diary appointment cancellation reasons (as set in Settings > Custom lists > Cancellation reasons and selected for the cancelled appointment).
- ABN of Support Provider: Conditional. Complete this field when claiming against plan managed service bookings. If the ABN of the support provider is available, enter it in the field. If the ABN of the support provider is unavailable, then enter any one of the following reason codes in this field: - EXCLS - REIMB Any other value, including blank, is not accepted, when claiming against plan managed service bookings. If you are making a claim against a standard service booking, leave the field blank. It is the unique Australian Business Number (ABN) of the provider who provided this support or service. In Power Diary, this is the business ABN as set on Business Info page.
Important
- Each item line included in a Power Diary invoice will generate a separate entry in the NDIS Bulk Upload report (i.e. multiple report entries may have the same Claim Reference (Invoice Number) if more than one item lines were included in that invoice).
- You may need to change the date format on the report if opened in Microsoft Excel as Excel will apply a default date format to any dates in the document which may not be in the format required by NDIS. You can find information on how to change the date formats in Excel here on Microsoft's support page if needed.