Learn about Power Diary's communication merge fields to automate email, SMS, and letter templates.
This article will go through the list of available Communication Merge fields, telling you what each one does. Merge fields are added to email, SMS and letter templates from the Tools → Communication → Templates menu.
This article just goes through each individual merge field and what it means. To learn how to add a Merge field to your templates, please review our article: Creating Communication Templates.
In this article:
- Appointment-specific Merge Fields
- Information Merge Fields
- Recipient Details
- Client Details
- System Merge Fields
- Client's Preferred Practitioner Merge Fields
- Referrer Merge Fields
- Next, Previous, Last, All Appointment Merge Fields
- User Merge Fields
- Links to Online Forms
Appointment-specific Merge fields
The following fields are based on the selected appointment. They will cause " (!)" to appear prior to the template name, and it means that an appointment needs to be selected prior to using this template. If no appointment is selected, a blank space will appear.
- Appointment Date: {AppointmentDate};
{AppointmentDate:ddd d, MMM}; {AppointmentDate:MMM d}
This field will be replaced with the date of the appointment. There are different options depending on how you want the date to be formatted. The fields above will display as 17/05/2022, Mon 17, May, May 17 respectively. - Appointment Start Time: {AppointmentStartTime}
The Start time of the appointment. The time will be shown according to the time zone of the account as set within Settings → Configuration → Business Info. Note that the time zone name will not be included, so you may wish to add that to your template if you have clients in a different time zone to you. Eg you might use "Your appointment is at {AppointmentStartTime} AEDT.", which will become "Your appointment is at 11:00 AM AEDT." - Appointment End Time: {AppointmentEndTime}
The End time of the appointment is again shown in the time zone of the account. - Appointment Service Name: {AppointmentServiceName}
The name of the Service attached to the appointment. - Appointment Location Name: {AppointmentLocationName}
The name of the Location of the appointment. You can learn more about Location details and settings within our article Setting Up and Using Multiple Locations. - Appointment Location Address: {AppointmentLocationAddress}
The address of the Location as specified within the Location settings. - Appointment Location Suburb: {AppointmentLocationSuburb}
The Suburb of the Location as specified within the Location settings. - Appointment Location Phone: {AppointmentLocationPhone}
The phone number of the Location as specified within the Location settings. The different locations of your practice may possibly have different phone numbers. - Appointment Location Email: {AppointmentLocationEmail}
The email address of the Location as specified within the Location settings. - Appointment Location Notes: {AppointmentLocationNotes}
The Notes for the Location as specified within the Location settings. Eg you may add extra notes on how to access Parking. We recommend you don't use this field for SMS templates, as it may cause the message to be too long. - Appointment Location Postcode: {AppointmentLocationPostcode}
The postcode of the Location as specified within the Location settings. - Appointment Practitioner Short Name: {AppointmentPractitionerShortName}
This is the "Shortened Name" from the diary the appointment has been booked with. You can learn more about the different Calendar settings within our Adding and Editing Practitioners article. - Appointment Diary Full Name: {AppointmentDiaryFullName}
This is the "Diary Name" from the diary the appointment has been booked with. - Appointment Diary Real Name: {AppointmentDiaryRealName}
This is the "Real Name" from the diary the appointment has been booked with. - Appointment Diary Mobile Phone: {AppointmentDiaryMobilePhone}
This is the Mobile Number from the diary the appointment has been booked with. - Add To Calendar: {AppointmentAddToCalendar}
This places the appointment date/time into the message as a placeholder and attaches an .ics file to the email received. The recipient must then open this attachment to trigger the add-to-calendar process for whichever calendar application they are using on their device. - Appointment Practitioner Job Title: {AppointmentPractitionerJobTitle}
This is the job title of the practitioner with whom the appointment is booked. - Group Appointment Name: {GroupAppointmentName}
This only applies if the appointment is a group appointment (or "class"), and is the name of the group appointment.
Information Merge Fields
These fields are used for general information about your practice, adding attached documents and invoice pay links, and also provide a way to be able to include today's date.
- Your Business Name: {BusinessName}
This is the name of your business as entered within Settings → Configuration → Business Info. You can learn more about the Business settings within our Updating your Business Information article. - Your Business Phone Number: {BusinessPhone}
This is the phone number for your business as set up within Business Info. - Todays Date: {TodaysDate}; {TodaysDate:dd MMMM yyyy}
Today's date, in two different formats. The first will display as dd/mm/yyyy, eg 31/03/2022. The second will display as 31 March 2022. - Attached Document Name: {SystemDocumentName1}
This applies when emailing an Invoice or Statement, and will be replaced with the name of the invoice or statement, for example, Invoice 3927, or Statement 32. If an invoice is fully paid, it will instead display as Receipt 3927. - Invoice Pay Link: {InvoicePayLink}
This applies when emailing an invoice only. It will be replaced with a link which your client can use to pay your invoice online. This only works if you have Stripe set up on your account. You can learn more within our Emailing Link to Pay Invoice Online article.
Recipient Details
When you are sending an email or SMS you can change who the message will be going to. The message may be going to a Contact or a Referrer, for example. The fields below get their information from the Recipient's profile rather than the client's. You can learn more about adding Contacts from our Adding Client Contacts article, and Referrers from our Adding/Editing Referrers and Referrals article.
- Recipient's Salutation: {RecipientSalutation}
This merge field displays the salutation of the recipient. - Recipient's Full Name: {RecipientFullName}
This merge field displays the full name of the recipient. - Recipient's First Name: {RecipientFirstName}
This merge field displays the first name of the recipient. - Recipient's Last Name: {RecipientLastName}
This merge field displays the last name of the recipient. - Recipient's Preferred Name: {RecipientPreferredName}
This merge field displays the preferred name of the recipient as set in their profile. If no preferred name is available, this merge field will display the first name instead. - Recipient's Number: {RecipientNumber}
This merge field displays the recipient's home number. - Recipient's Mobile Phone: {RecipientMobilePhone}
This merge field displays the recipient's mobile number. - Recipient's Email Address: {RecipientEmailAddress}
This merge field displays the email address of the recipient. - Recipient's Address: {RecipientAddress}
This merge field displays the physical (home) address of the recipient. - Recipient's State: {RecipientState}
This merge field displays the state of the recipient. - Recipient's Suburb: {RecipientSuburb}
This merge field displays the suburb of the recipient. - Recipient's Postcode: {RecipientPostcode}
This merge field displays the postcode of the recipient. - Recipient's Business Name: {RecipientBusinessName}
This merge field displays the business name of the recipient.
Client Details
These merge fields will help you populate the details of the clients with whom you're directly communicating in your business. The fields get their information directly from the client profile in which you're creating your communication template, or when you select the related appointment booked with the client.
- Client's Full Name: {ClientFullName}
This merge field displays the full name of the client. - Client's First Name: {ClientFirstName}
This merge field displays the first name of the client. - Client's Last Name: {ClientLastName}
This merge field displays the last name of the client. - Client's Preferred Name: {ClientPreferredName}
This merge field displays the preferred name of the client. - Client's Gender: {ClientGender}
This merge field displays the client's gender (this is a feature that is not available to new Power Diary accounts that were created after the 12th of July 2023, but is kept available to older accounts where Gender filed was originally provided). - Client's Sex: {ClientSex}
This merge field displays the client's Sex as it is recorded in their Client Profile - Client's Gender Identity: {ClientGenderIdentity}
This merge field displays the client's Gender Identity as it is recorded in their Client Profile - Client's Salutation: {ClientSalutation}
This merge field displays the salutation of the client. - Client's Number: {ClientNumber}
This merge field displays the recipient's home number. - Client's Date of Birth: {ClientDOB}
This merge field displays the client's date of birth. - Client's Mobile Phone: {ClientMobilePhone}
This merge field displays the client's mobile number. - Client's Home Phone: {ClientHomePhone}
This merge field displays the client's home number. - Client's Work Phone: {ClientWorkPhone}
This merge field displays the client's work number. - Client's Fax: {ClientFax}
This merge field displays the client's fax number. - Client's Email Address: {ClientEmailAddress}
This merge field displays the email address of the client. - Client's Address: {ClientAddress}
This merge field displays the physical (home) address of the client - Client's State: {ClientState}
This merge field displays the email address of the recipient. - Client's Suburb: {ClientSuburb}
This merge field displays the suburb of the client. - Client's Postcode: {ClientPostcode}
This merge field displays the postcode of the client. - Client's Medicare Number: {ClientMedicareNumber}
This merge field displays the Medicare number of the client. - Client's Medicare IRN: {ClientMedicareIRN}
This merge field displays the Medicare IRN of the client. - Client's Business Name: {ClientBusinessName}
This merge field displays the business name of a third-party client profile. (Not applicable for the referrer, contact, and client profiles). - Client's Occupation: {ClientOccupation}
This merge field displays the client's occupation. - Client File Under: {ClientFileUnder}
This merge field shows the text entered in the 'File Under' field in the client profile. - Client's Default Insurance Number: {ClientInsuranceNumber}
This merge field displays the default insurance number in the client's profile. - Nominative Pronoun (e.g. he, she, or they): {he/she}
This merge field displays the client's nominative pronoun based on their gender set in the client's profile. - Pronominal Possessive Pronoun (e.g. his, her, or their): {his/her}
This merge field displays the client's possessive pronoun based on the gender set in the client's profile. - Accusative Pronoun (e.g. him, her, or them): {him/her}
This merge field displays the client's accusative pronoun based on the gender set in the client's profile. - Predicative Possessive Pronoun (e.g. his, hers, theirs): {his/hers/theirs}
This merge field displays the client's predicative possessive pronoun based on the gender set in the client's profile. - Reflexive Pronoun (e.g. himself, herself, themself): {himself/herself/themself}
This merge field displays the client's reflexive possessive pronoun based on the gender set in the client's profile.
System Merge Fields
These merge fields allow you to provide access to core system features such as the Client Portal, telehealth, and online forms.
- Client Portal: {ClientPortal}
This merge field displays the link to your Client Portal. Clients can click on it to book an appointment with you. - Client Portal Registration Link: {PortalRegistrationLink}
This merge field generates a link for existing clients in your Power Diary account to register or reset their client portal login details - ClientTelehealthUrl: {ClientTelehealthUrl}
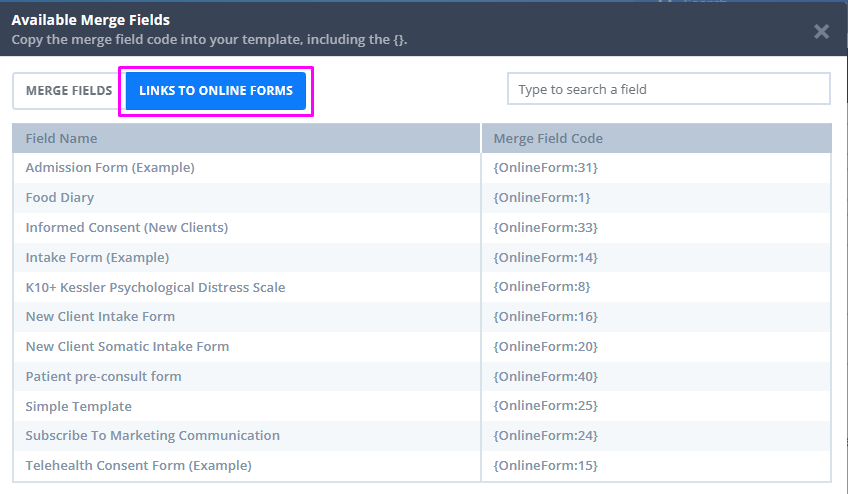
This merge field displays the unique telehealth link located in the client's profile. Using this link, your client can join the telehealth session that they've booked with you - Online Form: {OnlineForm:####} (#### is Form Template Id)
This merge field generates your desired form in your client's profile and automatically displays the link in your template enabling you to quickly send the form to your client.
Client's Preferred Practitioner Merge Fields
The client's preferred practitioner is set in Admin → Manage in the client's profile. The below merge fields allow you to display that practitioner's calendar information located in Settings → Calendars.
- Client's Preferred Diary Short Name: {ClientPreferredDiaryShortName}
Displays the preferred practitioner's short name. - Client's Preferred Diary Name: {ClientPreferredDiaryRealName}
Displays the preferred practitioner's real name - Client's Preferred Diary Full Name: {ClientPreferredDiaryFullName}
Displays the preferred practitioner's first and last name. - Client's Preferred Diary Email: {ClientPrimaryPractitionerEmail}
Displays the preferred practitioner's email address. - Client's Preferred Diary Mobile Phone: {ClientPreferredDiaryMobilePhone}
Displays the preferred practitioner's mobile number. - Client's Primary Practitioner Job Title: {ClientPrimaryPractitionerJobTitle}
Displays the preferred practitioner's job title.
Referrer Merge Fields
The referrer profile which you've selected as the default in the client's profile, that profile's details will appear via these merge fields. They will also work when you generate the communication template in the referrer's profile.
- Referral Start Date: {ReferralStartDate}
Displays the start date of the referral period with the client. - Referral End Date: {ReferralEndDate}
Displays the end date of the referral period. - Referral Notes: {ReferralNotes}
Displays the notes added under the referral entry in the client's profile. - Referrer Salutation: {ReferrerSalutation}
Displays the referrer's salutation. - Referrer Name: {ReferrerName}
Displays the referrer's name. - Referrer First Name: {ReferrerFirstName}
Displays the referrer's first name. - Referrer Last Name: {ReferrerLastName}
Displays the referrer's last name. - Referrer Company: {ReferrerBusinessName}
Displays the referrer's business name. - Referrer ID (Provider Number): {ReferrerProviderNumber}
Displays the referrer's provider number. - Referrer Fax: {ReferrerFax}
Displays the referrer's fax number. - Referrer Email: {ReferrerEmail}
Displays the referrer's email address. - Referrer Phone: {ReferrerPhone}
Displays the referrer's phone number. - Referrer Address: {ReferrerAddress}
Displays the referrer's physical address. - Referrer Postcode: {ReferrerPostcode}
Displays the referrer's postcode. - Referrer State: {ReferrerState}
Display the state where the referrer is located. - Referrer Suburb/Town: {ReferrerSuburb}
Display the suburb/town where the referrer is located.
Next, Previous, Last, All Appointment Merge Fields
The previous and next appointment merge fields display information related to a client's previous appointment or the next appointment which is scheduled to take place.
- Last Appointment Start Date and Time: {LastAppointmentStartDateTime}
Displays the start and end time of the client's last appointment. - List All Past Appointments: (Email/Letter Only) {ListAllPastAppointments}
Generates a list of all the past appointments of the client. - List All Future Appointments: (Email/Letter Only) {ListAllFutureAppointments}
Generates a list of all the future appointments of the client. - Next Appointment Start Date and Time: {NextAppointmentStartDateTime}
Displays the start date and time of the next appointment scheduled with the client. - Next Appointment End Date and Time: {NextAppointmentEndDateTime}
Displays the end date and time of the next appointment scheduled with the client. - Next Appointment Location Name: {NextAppointmentLocationName}
Displays the location name of the next appointment scheduled with the client. - Next Appointment Location Address: {NextAppointmentLocationAddress}
Displays the location name of the next appointment scheduled with the client. - Next Appointment Location Suburb: {NextAppointmentLocationSuburb}
Displays the location of the next appointment scheduled with the client. - Next Appointment Location Phone: {NextAppointmentLocationPhone}.
Displays the phone number of the next appointment's location. - Next Appointment Diary Short Name: {NextAppointmentDiaryName}
Displays the practitioner's short name with whom the client has their next appointment. - Next Appointment Diary Mobile Phone: {NextAppointmentDiaryMobilePhone}
Displays the mobile number of the practitioner with whom the client has their next appointment. - Next Appointment Diary Full Name: {NextAppointmentDiaryFullName}|
Displays the full name of the practitioner with whom the client has their next appointment. - Next Appointment Practitioner Job Title: {NextAppointmentPractitionerJobTitle}
Displays the job title of the practitioner with whom the client has their next appointment.
User Merge Fields
This merge field will merge information specific to the user that is logged in when sending the communication.
- User Signature (Email/Letter Only): {UserSignature}
If the user that is logged in has a signature uploaded in their profile and creates an email or letter that contains this merge field, their signature image will automatically replace the merge field. if the user has no signature image uploaded then the merge field will be blank. This only works for manually created email or letters, not any automatic communications such as reminders, or for SMS templates.
Links to Online Forms
When you create new online forms, or copy them from the Power Diary templates library, each such form will automatically have its own message merge field. To save you from going back to Tools > Form Designer and opening each form to copy their Message Merge Field, you can now select the Links to Online Forms button and copy the merge field of the form you need to include in your communication template: