Master Power Diary's Form Designer to create and customize forms. Learn about adding sections, reordering fields, previewing templates, and using various form fields.
In this article:
- Accessing the Form Designer
- Text: Single and Multiple Lines
- Select: Choose One Value or Multiple Values
- Yes/No Switch
- Draw/Annotation
- Information
- Signature
- Linked Profile Fields
- Client File Upload
- Adding and Reordering Sections
- Adding and Reordering Fields
- Previewing Form Template
- Understanding Actions Menu
Accessing the Form Designer
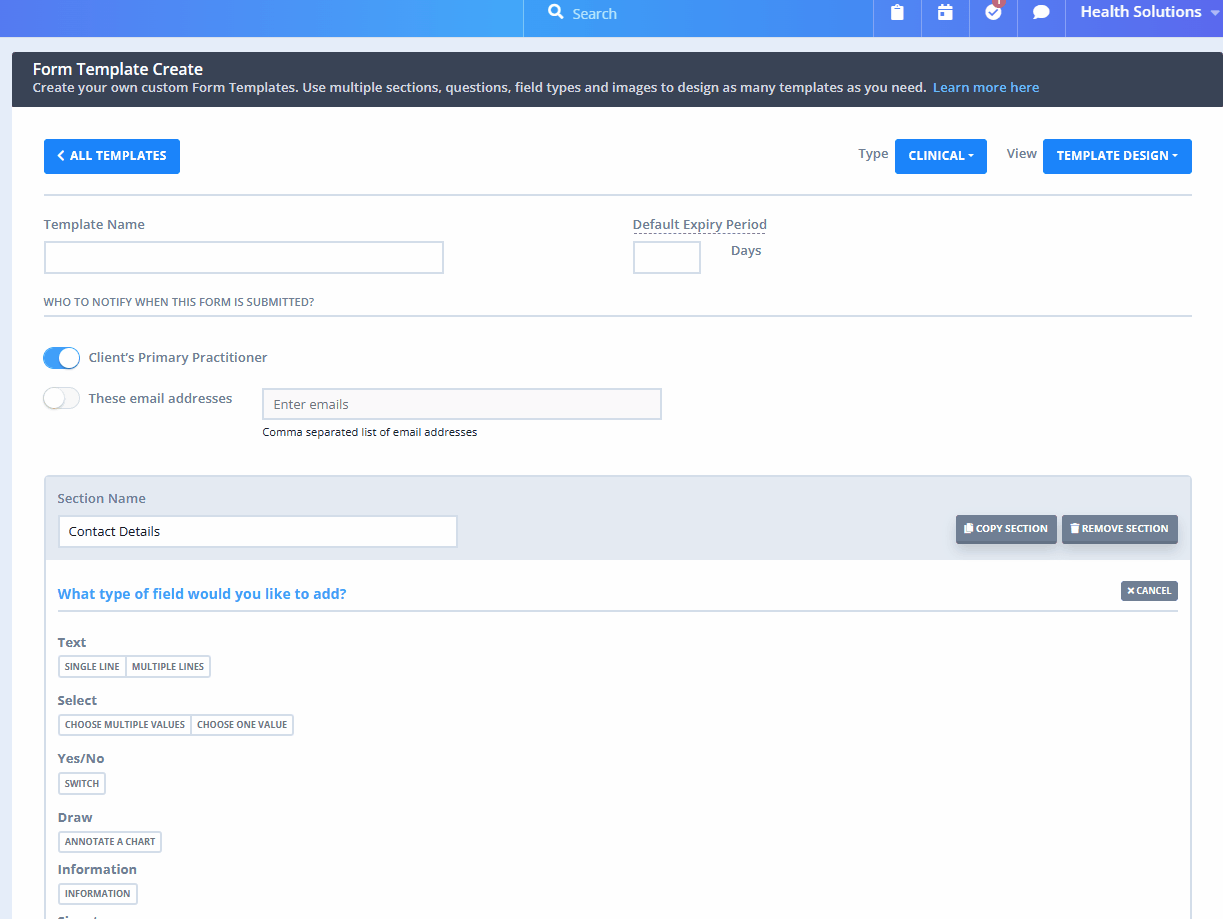
You can use the Form Designer to create intake forms, pre-appointment screening forms, consent forms, etc to collect information from your client. Below we go over and break down each of the types of fields you can use within your Form as well as how it will be displayed to your receiving client. The Form Designer can be accessed under Tools → Form Designer. This will bring you to the below-displayed page:

From here you will either select a Form you've already created to edit or you can click the + New Form Template button where you will see the screen below.
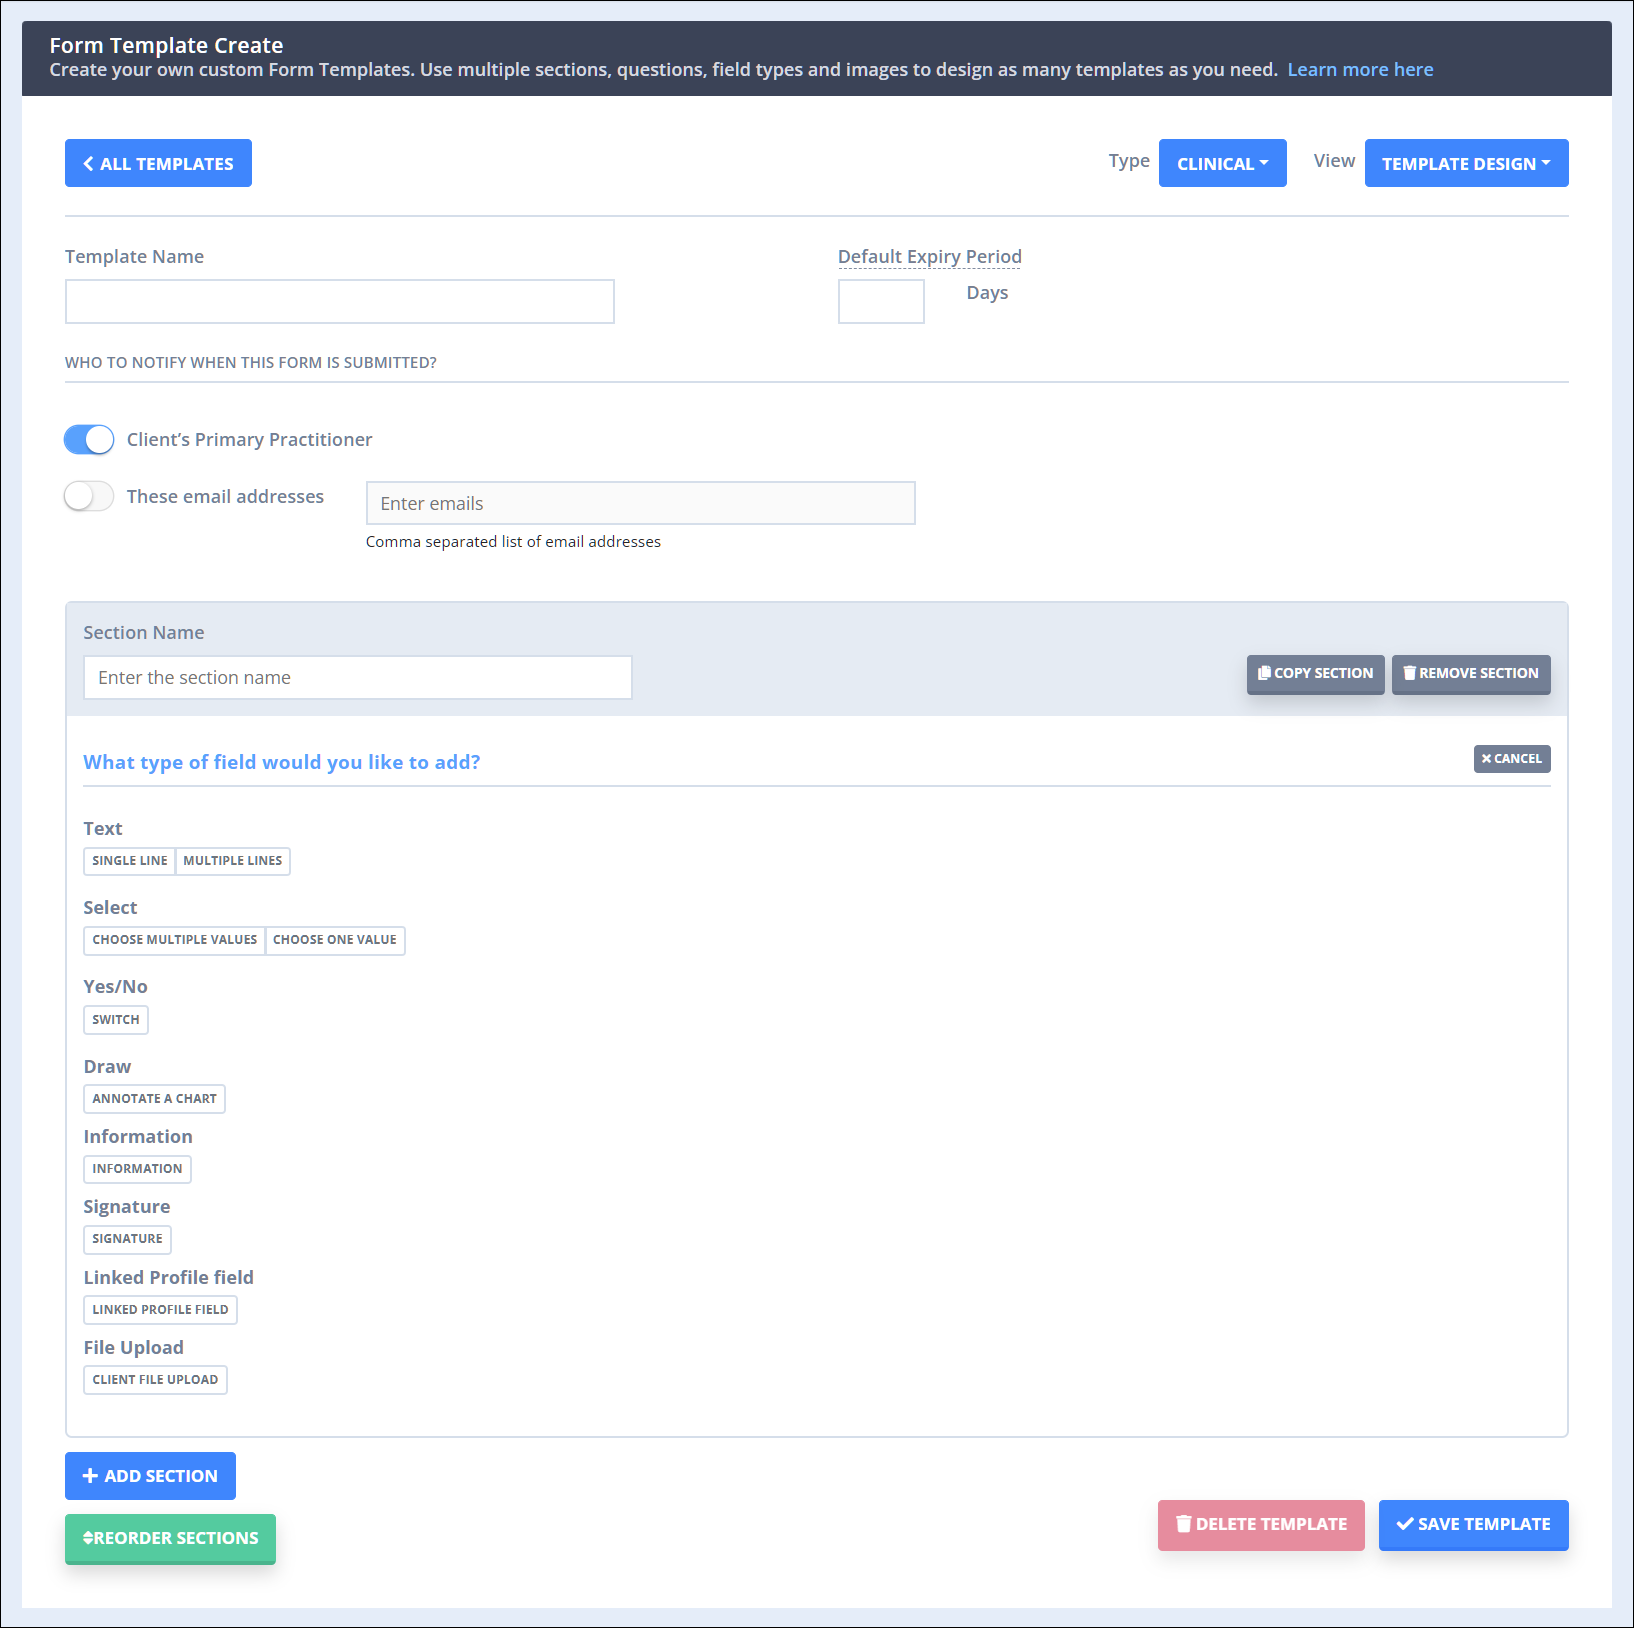
Once you are in an Online Form Template, you can add or remove sections using the buttons on the page. And within each section, you can add or remove Fields. Each field also has the option to require an answer (except for Information). If not all required answers are filled out, it will not show the Form as completed. Now we will go over each field you can add within the Form Designer.
Hint 💡
We recommend you always click Save Changes before navigating to something else. If you don't, however, you'll be prompted if you want to bring back any unsaved changes to your Online Forms;

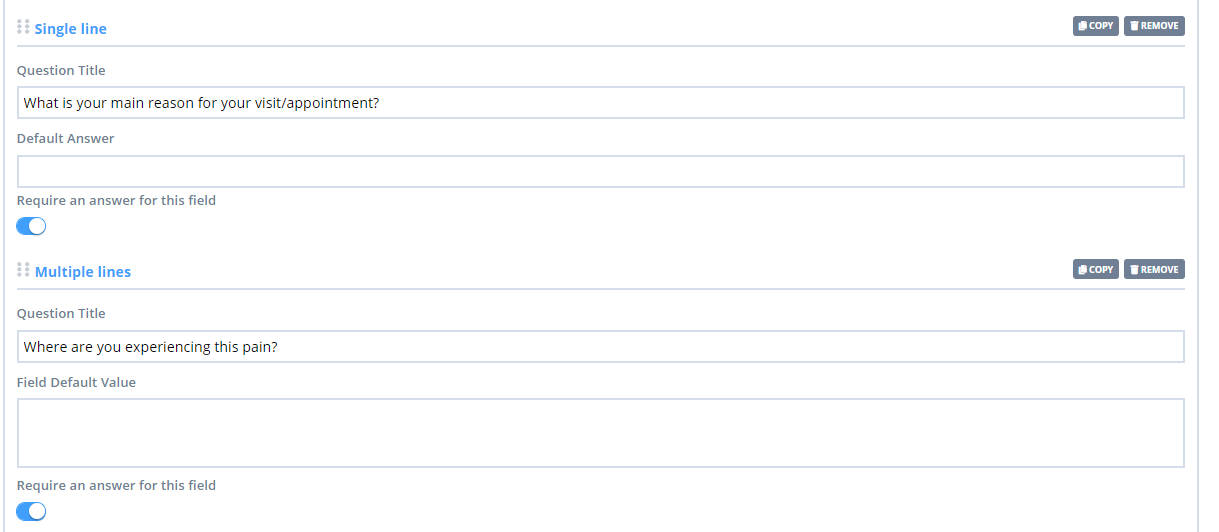
Single and Multiple Line Text
These fields will be used when you want your client to respond to the question with a couple of words or a couple of sentence answers. Single Line will allow for a couple of words or a sentence of text, if you need more than that you will want to use Multiple. This is what both fields look like during setup:
 This is what the client will see when they go in to fill out the Form:

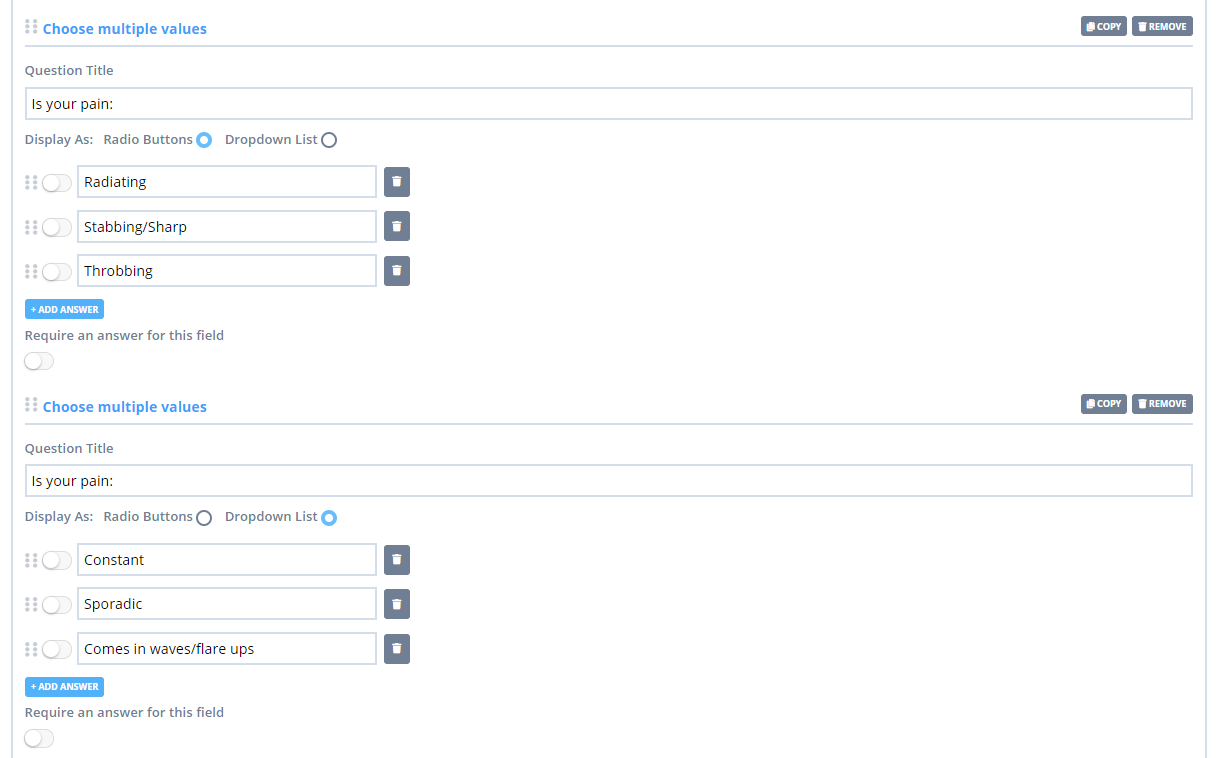
Select Single and Multiple Values
This field is used for Multiple Choice questions. With Multiple Value, this would allow you to list out answers and allow clients to select multiple answers. You can set it up as radio buttons or as a drop-down option. Below is what this would look like upon setup:
 This is what it would look like to the Client, when radio button display mode, or dropdown list display mode are selected:
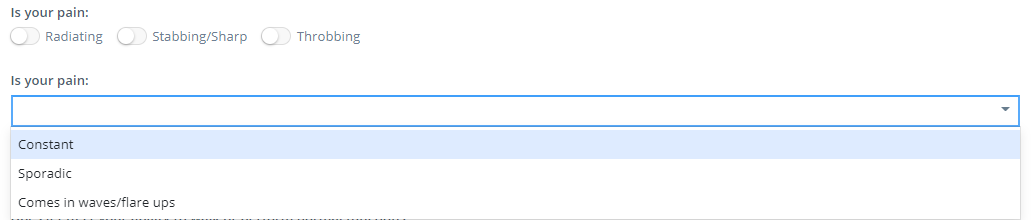 This is what it would look like once they entered in the answers:

With Single Value, the field allows the user to select only one answer from the list. You can set it up as radio buttons or as a drop-down option. Below is what this would look like upon setup:
 Below is how it would appear to the Client:

Yes/No Switch
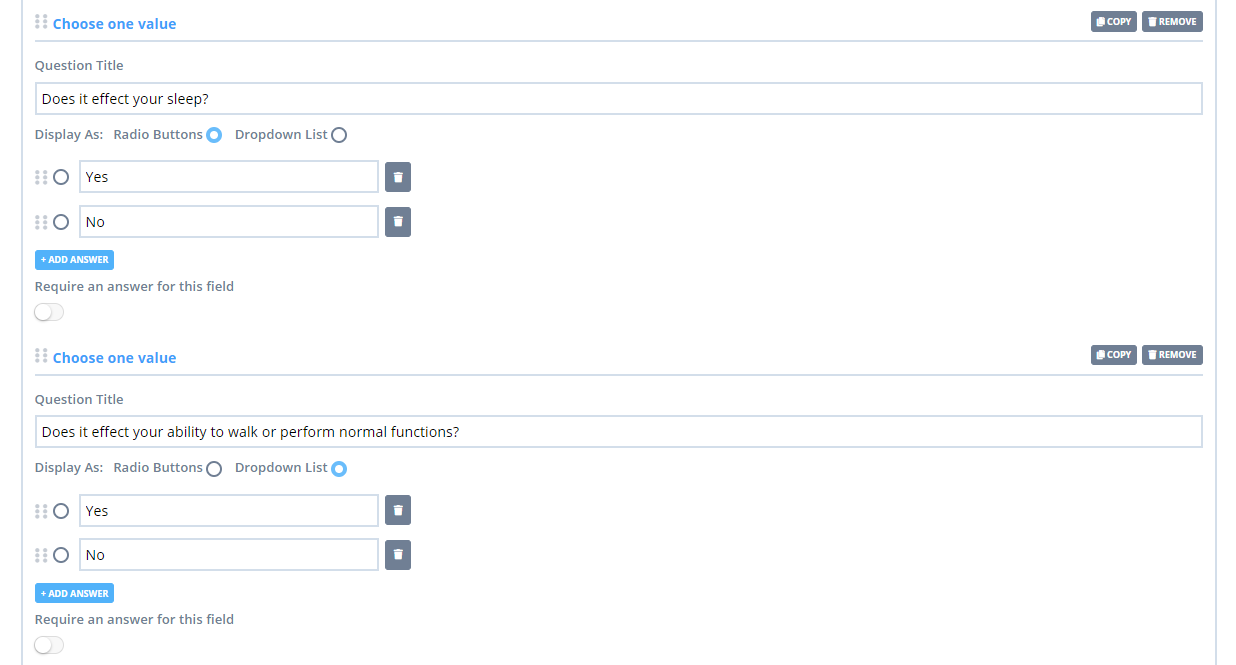
This field can be used for any Yes/No or either/or type Questions. The setup would look like this:
 It would appear to you Client as seen below, with the toggle being blue/on for yes, or grey/off for no:

Draw/Annotation
This area would be used to circle or mark on a diagram or picture of the body or part of the body. You can upload an image into this field depending on what you are needing. This is what it would look like during setup:
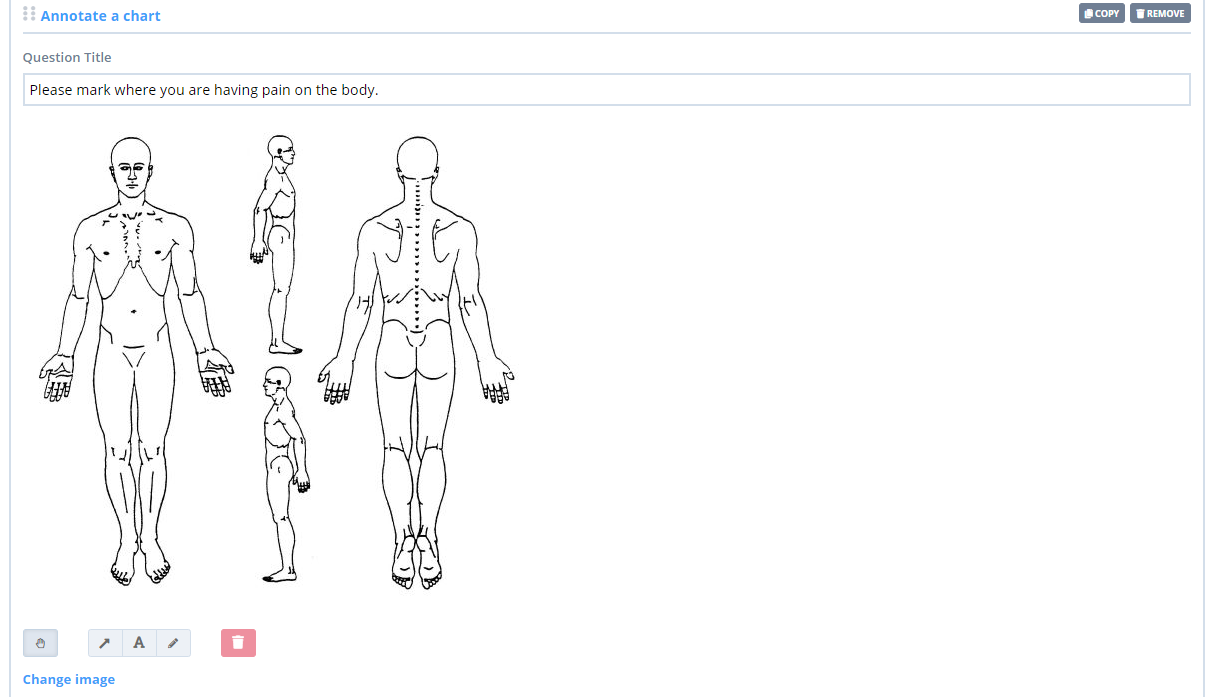 This is how it would appear to your Client:
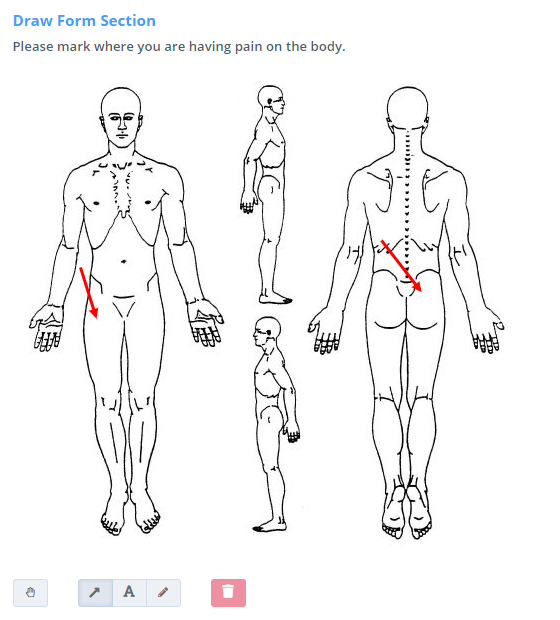 The Client can use the arrows, text and pen icons at the bottom to draw on the image. When making the text annotation, it is necessary to hit the Enter key once the text is typed up, to have it saved on the chart. The trash can is there so they can remove any accidental annotations they may create. Use the 'hand' button to unlick the annotations you made, to be able to move them around or in the trash bin.
Important
Any image size above 800 pixels will be rejected, with an error message stating "Image is too wide." In such a case, you may need to resize your Logo image for the best fit. There are some free online tools that you can use like Adobe. At the Resize step in the Resize For field, please select Custom from the dropdown, and then type the desired Width dimensions. The Height will update automatically.
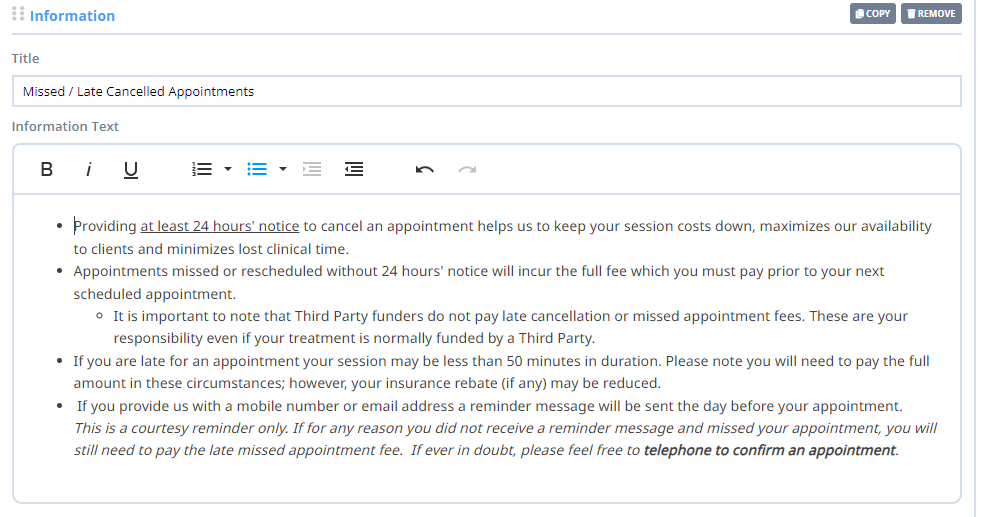
Information
This is just a field where you can input information. Use the formatting tools (bold, italics, underline, increase and decrease indent, ordered and unordered lists and undo and redo buttons) to enhance the readability and presentation of the text.
This is not an area for the client to supply an answer on this so it will appear as plain text to the client. Here is what it looks like during setup:
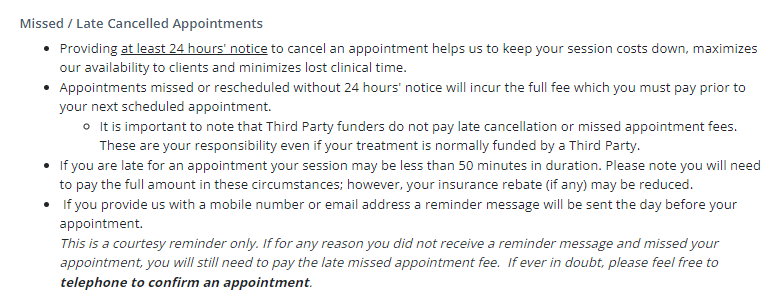
Here is what it will look like to your client:
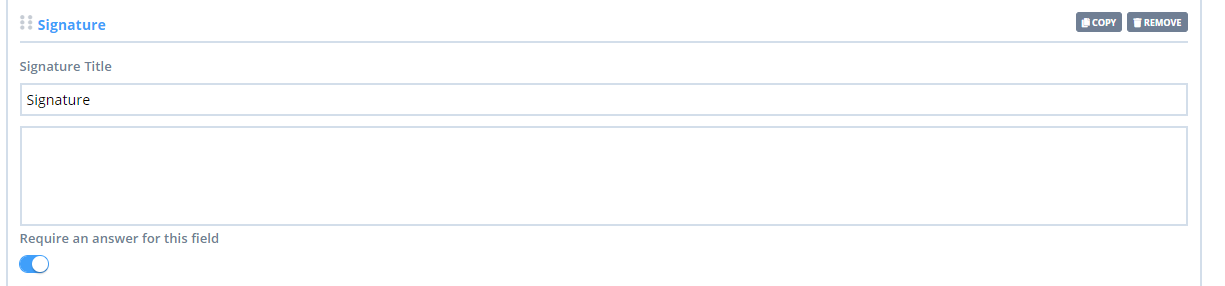
Signature
This field will be used if you need your Client to sign the document you are creating. This is how it would appear during setup:
 Here's how it would appear to your Client:

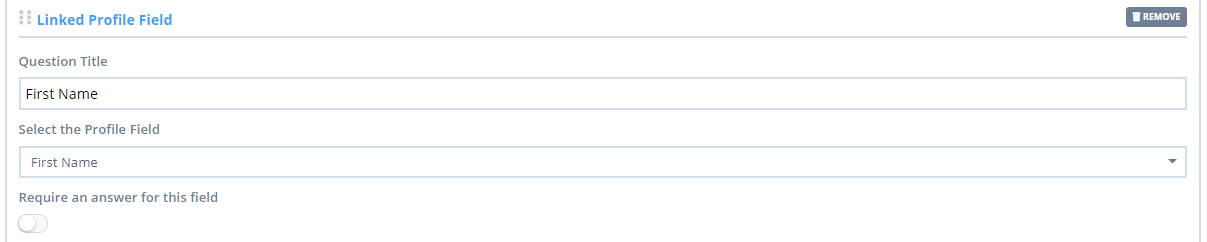
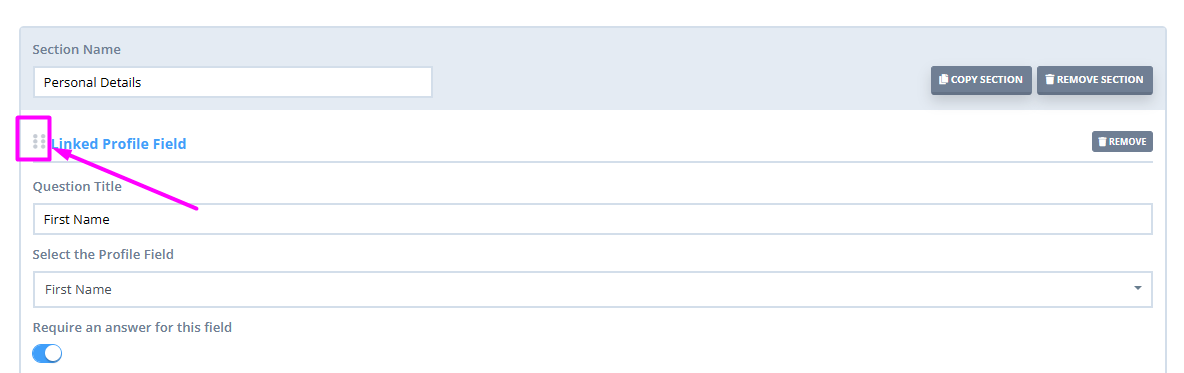
Linked Profile Fields
When you send clients a form that has Linked Profile Fields, the information your clients type in there will be auto-populated in the same respective field in their profile. This will give you the option to add:
- First Name
- Last Name
- Mobile Phone
- Home Phone
- Address
- City
- State
- Postcode
- Time Zone
- Date of Birth
- How Did You Hear About Us
- Preferred Name
- Gender*
- Sex
- Gender Identity
- Pronouns
- Occupation
- Salutation
- Subscribe to Marketing Communication
- Personal Data Consent
- Insurance Details (this can be used to collect the client's details for insurers you have set up in Settings → Payments → Insurers, for both public and private health insurers e.g. Medicare, DVA, NDIS, NHI etc).
For any insurance type that is Medicare (AU), DVA, NDIS, or NHI, when the client enters their insurance details on an online form, upon submission the system will update the existing insurance record for that client with the new details provided. This will ensure you can continue setting the insurance as a default for new clients without it resulting in duplicate insurance records when the client submits an online form.
Credit Card (Stripe) - using this field you can collect client credit card details via an online form and have it stored in Stripe securely (you need to have a Stripe integration enabled in your Power Diary account to see this linked profile field available.)
*Important
If you created your Power Diary account after the 12th of July 2023, you will not see the Gender field on the Linked Profile Fields list as it was removed from the system. Accounts that were opened before that date will still have the option to use this field.
This is what it will look like during setup with one of these fields:
This is how it would appear to your Client:

Linked Profile Fields will only work if the form is filled by the client themselves. If the form is created and completed directly into the client's profile under Records → Forms or Admin → Forms (depending on the type of Form), then the Linked Profile Fields in the form will not auto-update the client's personal information.
Hint 💡
A great workaround for adding a field for a physical signature rather than a typed one:
Select the chart function ( Add field → Annotate a chart) and upload a plain coloured jpeg. Size it approx 80 pixels high x 450 pixels wide

Client File Upload
To allow your clients to upload files to the form, you can add a Client File Upload section. This is what it will look like inside the Form Designer with one of these fields:

This is what it will look like for the client:

- The maximum size per file is 30 MB.
- There is a maximum of 10 files allowed per upload field.
- You can have multiple upload fields on a single Online Form.
- Clients can delete a file that has been uploaded before the form has been submitted.
- Clients will not be able to view the file they have uploaded (for privacy purposes), only the name of the uploaded files.
- Any files uploaded by the client will be accessible on the Online Form when viewed in the client profile.
- Users with access to the Online Form will be able to view and delete the files, though they cannot upload them into this section.
Adding, Copying and Reordering Sections
1. To add a new Section to your Online Form Template,
- Scroll down to the end of the Online Form Template.
- Click on the Add Section button.
- Create the section as needed.

2. To copy existing sections in the Online Form Template:
- Click the 'Copy Sections' button at the top-right of the section:

- A 'Paste Section' button will appear at the end of the online form template, on the left-hand side. Click it to paste the copied section to the template.

3. To reorder this new section or any other existing sections in the Online Form Template:
- Click on the Reorder Sections button;
- Grab the six dots in front of the section name to drag and drop the sections as needed;
- Click on the Finish Reordering to get back to the full template view.
Adding, Copying and Reordering Fields
1. To add a new field to a section,
- Scroll down to the end of the section
- Click on the Add Field button
- Select the type of field you want to add

2. To copy existing fields in the Online Form Template:
- Click the 'Copy' button at the top-right of the question:

- A 'Paste Field' button will appear at the end of the online form template, on the left-hand side. Click it to paste the copied field to the template.

3. To reorder a field,
- Grab the six dots in front of the field name
- Drag and drop the field in the desired position. The field can be reordered within the same section, and also dragged into any other existing section of the form.
Previewing Form Template
At any stage of creating or updating your form templates, you can get a quick preview of what it would look like for your account users and your clients. To help you with that, there is the View dropdown button available at the very top-right corner of each Online Form Template:

- Template Design view is selected by default when you open an existing template or start working on creating a new on in Tools → Form Designer.
- Select Data Entry mode to preview what your clients will see when they open a form that was created for them using this Online Form Template.
- Select Data View mode to preview what an account user will see when viewing data that was entered by a client in a form created from this Online Form Template.
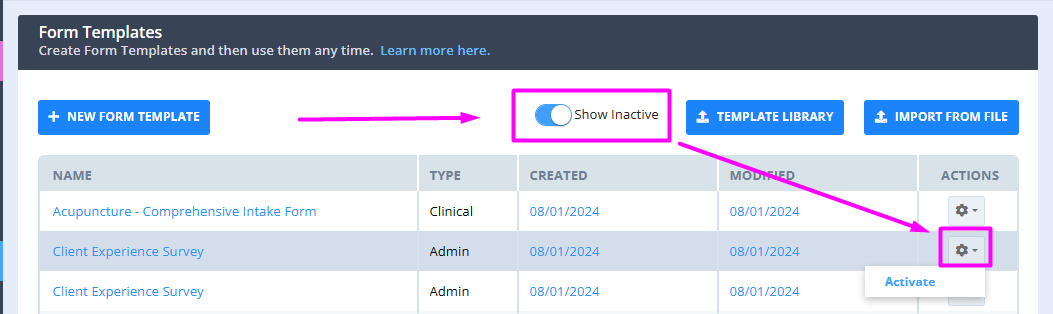
Understanding the Actions Menu
To open the Actions menu, click on the cogwheel icon next to a Online Form Template.
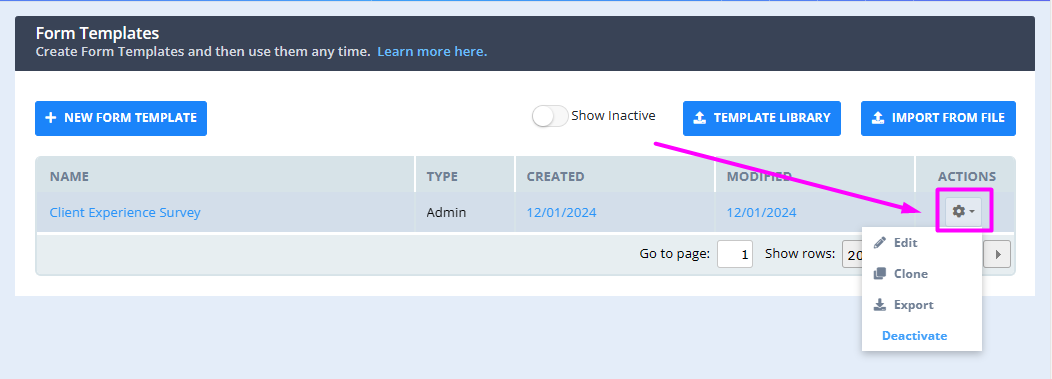
From this menu, you will be able to:
- Edit the Online Form Template;
- Clone the Online Form Template: clicking here will create an exact copy of this form template in the list of all your templates. It is useful when you need to have a few versions of the same form, each of which slightly differ: you can easily edit the cloned copy to implement those changes.
- Export the Online Form Template into a .txt file: this is useful if you use Power Diary accounts to run separate businesses, but would like to use the same form templates in all your Power Diary accounts. Once you have exported the form template from one account, you will be able to import it into another account via the Import From File button at the top-right corner of the Tools → Form Designer page.
- Deactivate the Online Form Template.
Hint 💡
If you deactivate a Online Form Template by mistake, it is possible to find the list of all the deactivated forms by activating the Show Inactive switch at the top of the Tools → Form Designer page.
You are also able to activate the deactivated Online Form Template if necessary: