Client Profile in Detail
When viewing the client profile there are many different sections associated. This will be your guide for any and all screens within the Client Profile section. This article will also contain links to more information, when applicable.
In this article:
Profile
Important
The numerals in brackets after the client name is usually referred to as The Client Profile Number (or Client ID#).
It is a system generated number and is allocated to a Client Profile consecutively at the time of creating the Client Profile. This is something that cannot be customised.

Details
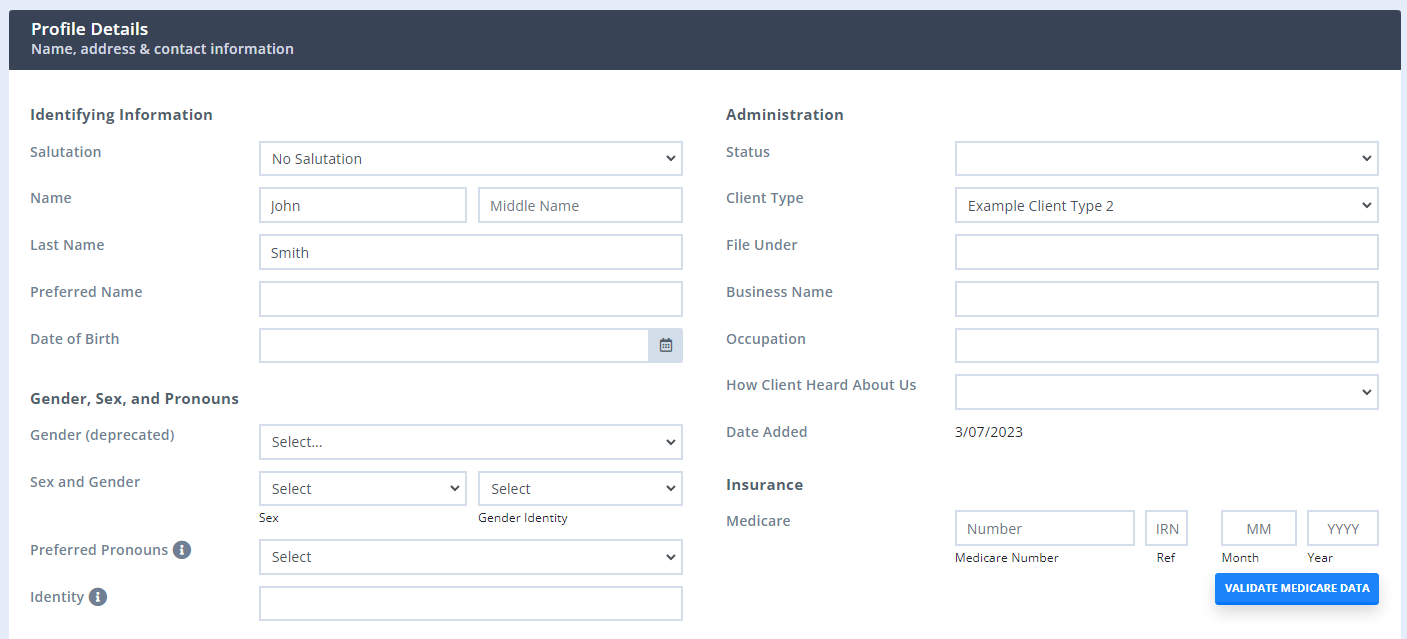
The Profile Details page is where you can input basic details of your clients. Or, if you're using forms that have linked profile fields, the information clients add in those form fields will automatically show here. To learn how to add linked profile fields to your form, and have clients input their profile details automatically, click here.
This is also where you will set the timezone of your client profile.

Important
If you created your Power Diary account after the 12th of July 2023, you will not see the Gender (deprecated) field on the Client Details page as it was removed from the system. Accounts that were opened before that date will still have the option to use this field.
Classifications
Here you can use the Classifications from your Custom Lists to help categorize your customers by various treatments or service types.

Contacts
Here is where related clients would be listed or other parties associated with that particular client. Learn how to add Client Contacts here.

Referrals
If a patient is referred by another practicing business this is where it will be displayed. For more information on Referrers click here.

Appointment Reminders
Here you can specify exactly how you would like an Individuals Reminders will go out. If you do not edit this for the client it will just default to what you have set under Settings → Configuration → Reminders.

Tasks
Tasks enable you to be automatically alerted to events like client birthdays, recurring appointments ending or when a session pack has ended and can be customized so that you can choose what and when you are reminded and how you action the reminder.

Appointments
Appointments
On this screen, you will find all of the Appointments listed for that specific client, including date, time, location, calendar/practitioner, status, as well as any Session Notes or Notes input into the Appointment Details on your Calendar screen. You can choose different filter options if you would like to see Future Appointments Only or Deleted Appointments.

Statistics
This will let you see the statistics for that specific client about how many Appointments they have booked, attended, cancelled, etc.

Here's a bit more information about what is included in client statistics:
- The total number of non-deleted appointments (including all statuses)
- Total attended = the number of non-cancelled, non-Pending appointments.
- Attended appointment this calendar year = the number of appointments this year with a status of Confirmed, Arrived or Completed
- Attended appointments since last referral = the number of appointments since the last referral with the status of Confirmed, Arrived or Completed
- Future appointments = non-cancelled appointments booked after today's date and time.
- No Shows = number of appointments with No Show status over the client's lifetime
- Cancelled Appointments = number of appointments with Cancelled status over the client's lifetime
- Late Cancelled Appointments = number of appointments with Late Cancelled status over the client's lifetime
- Rescheduled Appointments = number of appointments with Rescheduled status over the client's lifetime
- Attendance Rate = number of Pending, Confirmed, Arrived, Completed over the total number of booked appointments prior to the current date and time.
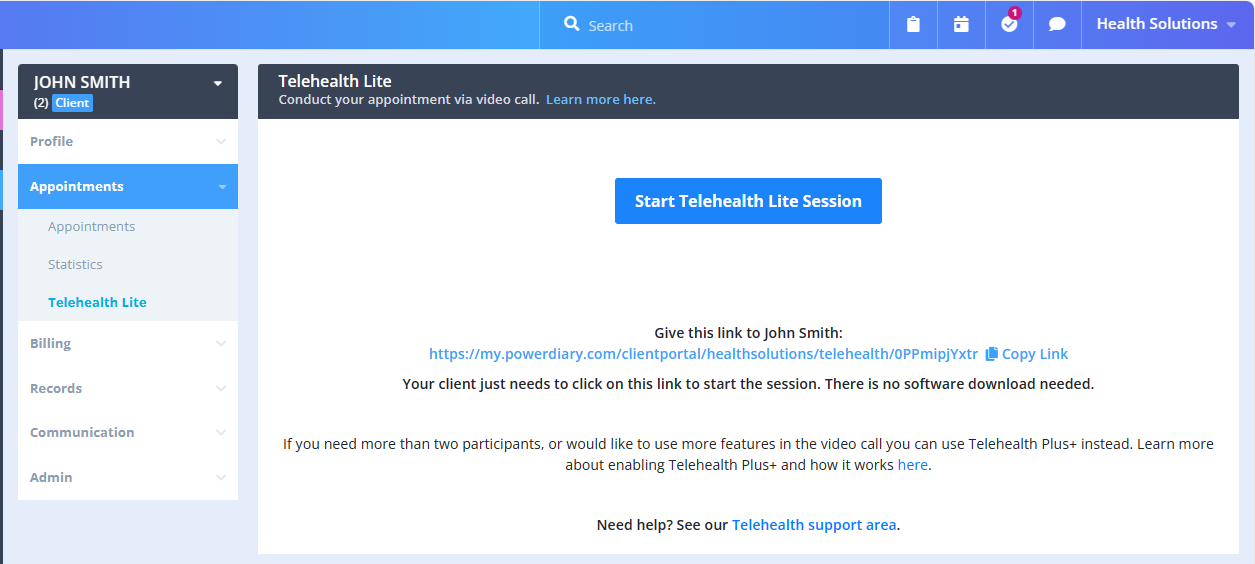
Telehealth Lite
This screen is what you will use when you want to conduct a Telehealth Lite session with the client. Make sure you sent your client the link to get started!
Billing
Billing Setup
On this page is where you would save payment information for the client. De-Identify Invoices setting would remove the Client's Name and Appointment Time. Here you can also specify a percentage or amount of discount automatically to that particular client's invoices.
- The Extra Invoice Info can be used to add some client-specific information that will be populated on all their invoices automatically. Once the text is saved here, it will appear on all generated invoices, including the already created past and future dated, when invoices are printed or emailed.
- The Bank Account form saves the client's bank account details to be used for submitting Medicare Patient Claims. The bank details added here will override the client's bank details registered with their Medicare card.
- The Add Credit Card form feeds into your Stripe account and the client CC details will be securely saved there to be used for Stripe online transactions.

Insurance
This is where you can specify the insurance that the client uses if they have one such as Medicare (AUS), DVA (AUS), NDIS (AUD), or any private health insurance numbers. The insurance number can be linked to invoices so that it is shown on the printed invoice for claiming. If you are in AU we integrate with DVA/Medicare, for more on Medicare Claiming click here.

Invoices
In this part of the profile, it will show all paid and outstanding Invoices for the client. You can see what Appointments they are associated with and can edit them if necessary. You can also view deleted invoices for the client and restore them to active if needed.

Payments
This section will show all payments that have been made by the client with the amount and the method of payment. You can edit the payment to allocate or unallocate it to one or more invoices.
 Statements
In some instances, you will need to create Statements for the client, insurance or a Third Party. This is where you can create and view those. In this example, the statement is all of the July invoices combined in the form of a monthly statement.

Session Packs
You can use Session Packs to keep track of prepaid subscriptions a client has bought, the number of appointments your referral has had with your clinic and the pending appointments a client has to take with you.

Records
Notes
Here is where all the Session Notes will be displayed for this client. The pink is an Admin Note and the grey is a Session Note.

Files
This is where any Client Uploads will be displayed. You can drag and drop any pertinent client documents into this section to be saved and stored.

Correspondence
Any SMS or email messages sent to the client through the system will be displayed here in the Correspondence section.

Forms
Any Forms that have been sent to or completed by the client will display on this screen. The pink is an Admin Form and the grey is a Clinical Form.

Communication
Activity
Here all the Communication activity will display as it does in the Correspondence section, but will only show the last year.
 New SMS, New Email, New Letter
These next three sections of the profile are where you would create/send out a communication to your client. You have the option for SMS/Text, Email or Letter format.
Important
A dedicated Toll-Free Number (TFN) is required to send/receive SMS messages in the USA, Canada, Puerto Rico, Bahamas, Jamaica, Costa Rica, and Barbados. For more details, please click here.
Admin
Manage
On the Manage section of the Admin Tab, there are many settings available to you.
- You are able to control whether the person input is a Client, Referrer, Contact, Third Party or combination of the four.
- Primary Practitioner can be set up manually by the user or will be assigned automatically when a new client books their first appointment via your Client Profile. The Primary Practitioner will have access to the confidential information, including clinical notes, files and forms.
- Users with Access have the same level of access to client profile as their Primary Practitioner. Can be used when the client has appointments with more than one practitioner.
- Alert notes let you put an Alert on the Client account that will pop up in the Client Details under the Notes section when booking an Appointment.
- New Appointments - you can either allow or block the ability to create new appointments. This will affect manual bookings made by the staff members and the online bookings made by clients via the Client Portal.
- Default Appointment Flag will make it so that anytime that person books, their Appointment is automatically flagged.
- Portal Password Reset allows you to email the client their client portal password reset link.
- Appointment Warnings will display a warning icon on the diary screen.
- Xero Contact Id will be used if you use the Xero integration.
- Subscribe to Marketing Communication toggle will determine if they will be sent Marketing emails when Sending a Marketing Campaign.
- Receives SMS dropdown allows you to subscribe or unsubscribe a client from receiving SMS communication from your account.
- Personal Data Consent is used to record if a client has provided consent for you to collect, store or process their personal data. (Applies when a client lives in the EU and are subject to GDPR.)
- The coloured buttons on this screen allow you to: Merge with Another Profile in case of duplicates or needing to merge information, Archive the client if you no longer want them active, or Delete the client if you want to remove them from your system completely which is irrecoverable. Archiving and Deleting Clients has more on this topic.


Important
If you delete a client, the system will process your request in 48 hours. In this grace period, you have the option to restore your client profile. This is useful in cases where you accidentally delete the wrong client profile or change your mind about deleting the client profile altogether. Should you choose not to restore within 48 hours, then the client profile will be permanently deleted. For more details, look here.
Admin Notes
Only Admin Notes will display in this section. They also display on the Records section in pink.

Admin Files
Only files saved here will display here. They will not display in the client records.

Admin Forms
Only Admin Forms will display here. Admin and Clinical Forms will display up in Records.

Physitrack
Once you integrate Physitrack into your Power Diary, this will add another tab to the Client Profile. This will direct you to their Physitrack Profile.
