Adding Your Client Portal to Your Website, Social Media and Google
Adding your Client Portal to your website via either a book now button or by directly embedding it into your website is a great way to promote client bookings and save you administration time.
In this article:
The Client Portal allows your clients to directly book appointments with you - without you having to do a thing! In this article, we will give you step-by-step instructions on how to add your Client Portal to your website using a few different methods.
Copying the Client Portal URL
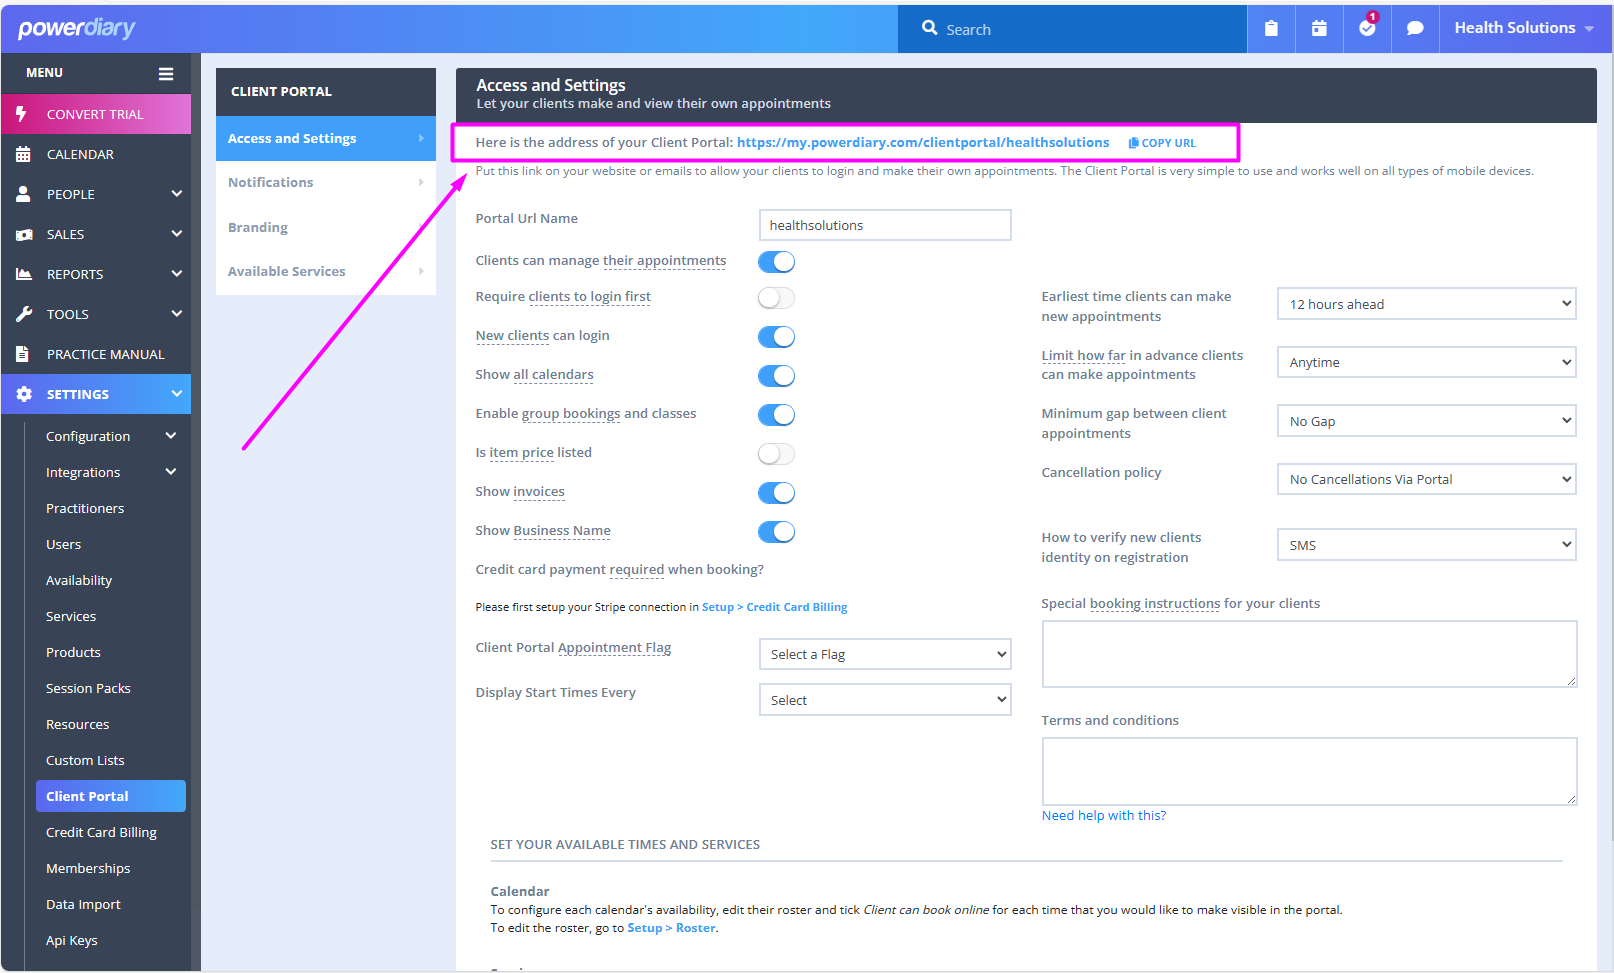
Before you can add the Client Portal to your website, first you’ll need to copy the Client Portal URL from Power Diary. To find your unique client portal URL, simply navigate to Settings → Client Portal;
At the very top of this page, under ‘Access and Settings’, you’ll find the unique URL to your Power Diary Client Portal.
Under it, you’ll see the ‘ Copy URL’ option. Click on it to copy your unique Client Portal URL link. This link will take clients directly to your Client Portal, but it wouldn’t look nice to place this on your website in its raw form so let’s look at some neater options.
Option 1: Adding a Book Now button
A book now button is the most straightforward method for adding the Client Portal to your website. You should be able to easily do this depending on how your website is configured and through which service. In this scenario, you’re simply adding the link you copied above to a button that leads to your Client Portal. (If you don’t manage your website yourself simply send the link to your website manager and they should be able to quickly take care of it for you.)
Option 2: Embedding the Client Portal
Embedding your portal is slightly more difficult, but manageable. To do this you simply need to insert the client portal using an iframe. An iframe is an HTML tag that allows you to embed external websites into a webpage.
At its most basic, the iframe should look something like this:
<iframe src="https://my.powerdiary.com/clientportal/yourclinicname" height="75%" width="75%"></iframe>
Please Note:
We've found that if a Client Portal is embedded using an iframe and someone on an Apple device accesses it using Safari they will see a message: “Your browser doesn’t support cookies.” and will not be able to use the Client Portal. This is because Safari is identifying the Client Portal as a separate site. To resolve this, please replace it with the following;
<iframe src="https://clientportal.powerdiary.com/clientportal/xxxxxxxx"
height="1000px"
width="100%"
border="none"></iframe>
<script src="https://clientportal.powerdiary.com/dist/portalEmbed.js"></script>
This will not display the Client Portal itself, but will instead display a 'Book Now' button which your clients can click to go to your Client Portal instead. Like this:

Option 3: Linking using HTML code
Let’s say you have a paragraph of text on your website explaining how easy it is to book appointments with you. You may want to insert a link to your Client Portal within that text so clients can click straight through and make a booking.
Depending on the website builder you use you may simply be able to highlight the text in your paragraph and click on an ‘add link’ button.
It might look something like this, and you can then just add the link you copied above:

If you don’t have this option you can do the same thing. You’ll just have to add some simple HTML code that tells web browsers that the text is a link, and what it should do if someone clicks on it. Here’s how you can do that:
Enter your Client Portal URL copied above into this HTML code:
<a href="Insert Client Portal URL Here" target="_blank"> Book Now </a>
Once you do that, your HTML code should look something like this:
<a href="https://my.powerdiary.com/clientportal/204a0eb0-da9b-4d3f-8494-c734bc6134c2" target="_blank">Book Now</a>
This code is designed to open the Client Portal in another tab. This way, your website remains open and your clients can return to it after they are done booking an appointment.
If you don’t want the Client Portal to open in another tab, simply omit the target=“_blank” part of the HTML code like this:
<a href="https://my.powerdiary.com/clientportal/204a0eb0-da9b-4d3f-8494-c734bc6134c2">Book Now</a>
Doing so will open the Client Portal in the same window as your website.
Pro-Tip 💡
You can replace the ‘Book Now’ text with anything you want. For example, you can edit it to say ‘Click Here To Book an Appointment’ and it would look like this:
<a href="https://my.powerdiary.com/clientportal/204a0eb0-da9b-4d3f-8494-c734bc6134c2" target=“_blank>Click Here To Book an Appointment</a>
Once you have this link, you can paste it inside any HTML text area of your website. And that’s it.
In a few simple steps, you’ve successfully embedded an HTML link to the Power Diary Client Portal on your website. Once your clients click on this link, they will be taken to the Client Portal, where they will be able to easily book an appointment at any time.
Adding Client Portal URL to Your Facebook and Instagram Account
You can use your Power Diary Client Portal URL to add it to your Facebook account Intro page as a website

Adding Client Portal URL to Your Google Profile
You can use your Power Diary Client Portal URL to add it to your Google Profile account settings as a website:

Note💡
Below is an example of what your Client Portal might look like:
